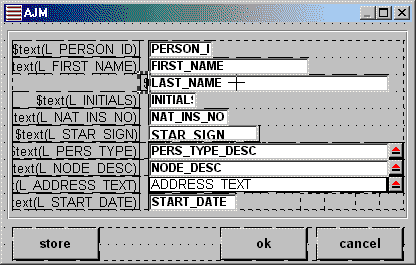
When you add a widget to a form to represent a field you can also add a separate label object to give the user a visual clue as to the usage of that widget, as shown in Figure 1.
Figure 1 - Widgets with Labels

The text for the label can either be a literal string, or it can be in the form $text(id) which will retrieve text from the message file using 'id' as the identifier. The latter form is usually preferred as it allows label text to be modified in the message file rather than having to modify and compile individual forms. It also makes it easier to have different versions of the text available for different language codes.
What are the advantages of associating labels with widgets?
- The widget and the label are treated as a single object, so if you click the mouse on the label it is the same as clicking the mouse of the widget itself.
- If the widget is a checkbox then clicking on the label will toggle the setting in the checkbox. This is sometimes useful as the label is normally bigger and easier to hit with the mouse cursor than a single-character checkbox. (see example in Figure 1 above)
- If you use the
field_syntax command to hide a widget this will also hide any associated label.
- When a field is defined in the application model you may include a default value for the field's label. When a label is associated to the field in any form the text for the label will automatically be inherited from the application model. My personal preference is to create field labels in the message file with the identity of L_<fieldname> and in the application model I set each field's label to $text(L_<fieldname>). By associating each label with its corresponding field I never have to manually define any label text in any form - it is automatically set for me.
How can you associate a label with a widget?
There are several choices:
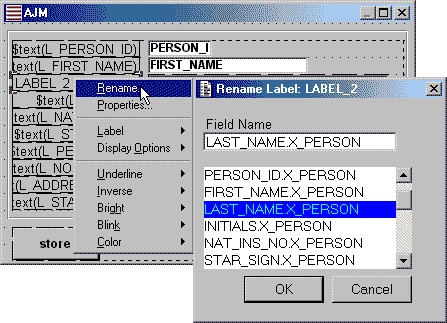
- Paint the label on the form, then right-click to bring up a context menu. Select Rename and a dialog box will appear containing a list of field names on the current form, as shown in Figure 2. Select the relevant field name, then press OK to complete the action.
Figure 2 - Renaming a Label (1)

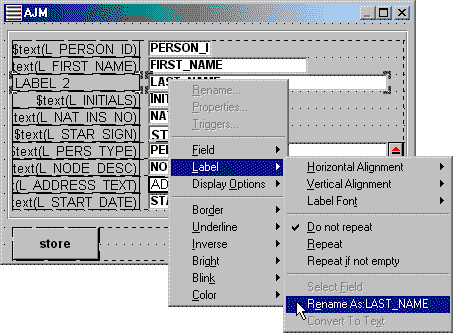
- Paint the label on the form, then, while holding down the shift key, select the relevant widget. Both widget and label will now be selected (this is known as 'multi-select'). Right click to bring up a context menu, then select Label and Rename As as shown in Figure 3. Note that you have already selected the field name, so there is no need to step through a list of options. When the message 6467 - Label already has a name. Do you want to rename it? appears, just select the YES button.
Figure 3 - Renaming a Label (2)

- From the Tool Palette select the label object then click on the relevant widget. UNIFACE will automatically create a one-character wide label and attach it to the widget's border as shown in Figure 4. All you are left to do is extend the label to the desired width.
Figure 4 - Creating a named Label

- If you use the 'Load Fields' option to insert fields into an empty entity all the fields will be painted with their associated labels, and these labels will inherit any label text defined in the application model.
- When you create a component from a component template, and the component template contains any generic fields with associated labels, those labels will still be associated with those fields after passing through the object binding process.
Tony Marston
18th August 2002
mailto:tony@tonymarston.net
mailto:TonyMarston@hotmail.com
http://www.tonymarston.net


