


|
Main Index
PREV
NEXT
|
When you come to create a new component you should see one of the dialog boxes shown in Figure 1 or Figure 2.
Figure 1 - From File - New in the pulldown menu
Figure 2 - From the Open Form window
In order to select which component template to use you will then be presented with the Browse Component Template window as shown in Figure 3.
Figure 3 - Browse Component Template window
By confirming to use a component template you will be presented with the Object Binding screen as shown in Figure 4.
Figure 4 - Bind Entities window
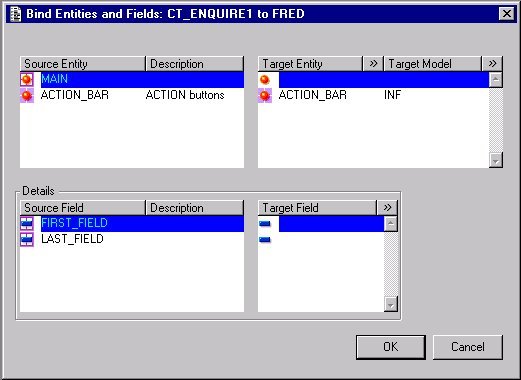
The top left-hand area shows the source entities that have been defined in the component template. The top right is the area where you define the target entities required within the component. As each source entity is selected the bottom left area will show the source fields that have been defined for that entity, with the bottom right used to specify the target fields.
The following icons are used in front of the source entity and fields names:
| Generic Entity - a target entity must be defined. | |
| Non Generic Entity - the source entity is the target entity. | |
| Generic Field - a target field must be defined. | |
| Non Generic Field - the source field is the target field. |
Note that the ![]() button can be used to browse through the repository in order to select the model, entity and field names.
button can be used to browse through the repository in order to select the model, entity and field names.
Once you have specified targets for all the generic objects you simply press the OK button and the component will be built for you, with all the source objects replaced by their specified targets. The new component will include all trigger code defined within the template, plus any defined within the application model for the target objects. All that is left is to resize the objects (if necessary), insert any missing objects, and the finished component is ready for compiling and testing.
If any of the proc code contains references to generic entities or generic fields you will still see the generic names, as in the following example:
clear/e "<MAIN>"
getlistitems/occ $params$, "<MAIN>"
retrieve/x "<MAIN>"

if (!$dbocc(<MAIN>))
   putmess "primary key: %%$params$"
   message $text(M_90007)  ; no entry found
   exit(1)
endif

edit <FIRST_FIELD.<MAIN>>
These references will not be resolved until the component is compiled, so to see the actual object names that will be used at run time you must either refer to the compiled listing or the Bound Objects screen (which can be accessed from the pulldown menu).
When you wish to view or edit the trigger code within the component you will go through the Edit Component Trigger dialog as shown in Figure 5.
Figure 5 - Edit Component Trigger window
The following icons in front of each trigger name will indicate if the code is inherited or not:
| Inherited from the Component Template. | |
| Not inherited from the Component Template. | |
| Inherited from the application model. | |
| Not inherited from the application model. |
To lose any inheritance simply modify the code within the trigger. To reinstate the inheritance simply double-click on the trigger name in the Edit Component Trigger window. This will cause the Restore Trigger Contents window to be displayed, as shown in Figure 6.
Figure 6 - Restore Trigger Contents window
Press the OK button to restore the inheritance of this trigger.
 |
http://www.tonymarston.net |