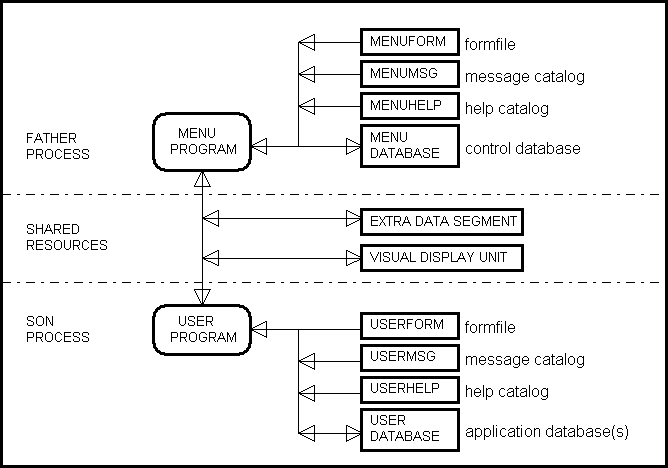
Figure 2.1 - The MENU father and Application son processes
| Author | : | A J Marston |
| Date Created | : | March, 1988 |
| Date Revised | : | February, 1993 |
| Version | : | 01.010.010 |
This Menu and Security system is used as the standard front-end for all new developments that need to be controlled by an online menu. Other documentation is available in the following manuals:-
The purpose of this manual is to describe the procedures that are to be followed when developing a new application system so that it can be fully integrated with the Menu and Security system in order to take full advantage of the numerous facilities that are available. As our preferred development language is COBOL it is assumed that all development personnel are familiar with the following documents:-
Figure 2.1 shows the file structure of an application that has been built into the MENU program. The most important feature is that the MENU and the application are contained in separate program files, and each program file accesses its own VPLUS forms file, message catalog, help catalog, and IMAGE database(s).
The reasons for keeping these files separate are as follows:-
The MENU program contains the code to process the logon screen, all menu screens, jobstreams, MPE commands, the transactions that maintain the contents of the MENU database, and to pass control to the application program should a module within that file be requested. The User program file contains all the application subprograms. These are controlled by a `dummy' front-end program called MENUSON, which handles all communications with the Menu (father) process by means of an extra data segment (XDS). An XDS is a method of passing data between processes without the overhead of any disk I/O's.
The VDU (Visual Display Unit) is also a shared device. It is not opened/closed by each process as that process takes control as this would be a considerable overhead. Any possible problems are avoided as only one process at a time will be active, therefore only one process at a time will be reading/writing to the VDU.
The MENU database is not opened by any son process as multiple opens in the same session could lead to problems. It is therefore impossible for any application module to access the MENU database directly. Where any such accesses are required a utility routine will be available which will instruct the father process to perform the access and pass the results back via the extra data segment. These utilities are described in Library of Standard Utilities - Accessing the MENU database.
Figure 2.1 - The MENU father and Application son processes
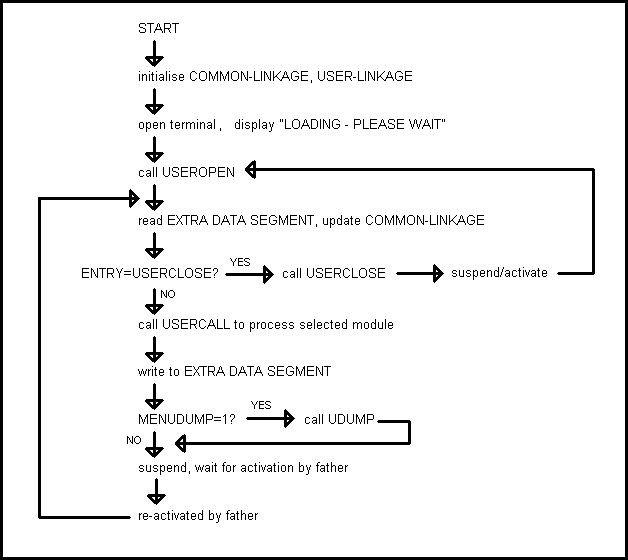
Figure 2.2 shows the processing flow of the MENUSON program. This is a relatively small and simple program as all it does is pass control between the MENU program and the application subprograms. It contains calls to the following subprograms:-
| USEROPEN | To initialise USER-LINKAGE and open the application files |
| USERCALL | To pass control to the selected application subprogram |
| USERCLOSE | To close the application files |
| UDUMP | To print the contents of USER-LINKAGE |
Skeleton versions of the USERxxxx subprograms are supplied with the MENU software, and have to be tailored for each individual application. More detailed descriptions are contained in later sections within this document.
UDUMP is a standard utility that will be called if a jcw (job control word) with the name of MENUDUMP is set with a non-zero value. This is a debugging aid that will dump the contents of USER-LINKAGE to a printfile named LINKDUMP after each application module exits and before control is passed back to the MENU program. This facility should be used in the development environment only.
All of the above subprograms are called with the following:
CALL "<name>" USING COMMON-LINKAGE, < universal >
                    USER-LINKAGE.   < application dependent >
When the son process is first created within a user's session (when the first application module is selected) there will be a short delay while all the necessary files are opened. As each module exits it will leave the files open, and the MENUSON program will hold itself in a suspended state so that when reactivated by the MENU (father) process it can satisfy the next request almost as quickly as if the subprogram were called directly from within the Menu program.
If the user returns to the logon screen the USERCLOSE routine will be called to close the application files, but the process will remain in a suspended state with the terminal left open.
Figure 2.2 - Process flow within the MENUSON program
Before this system can be loaded the appropriate account and groups must be defined on the system:
NEWACCT accountname,MGR;CAP=AM,AL,GL,ND,SF,IA,BA,LG,PH,DS
                   ;ACCESS=(R,X:ANY;W,A,L:AC)
NEWGROUP PROG;CAP=IA,BA,PH,DS;ACCESS=(R,W,A,L,S,X:ANY)
NEWGROUP DATA;CAP=IA,BA,LG;ACCESS=(R,W,A,L,S,X:ANY)
NEWGROUP FORMS;ACCESS=(R,W,A,L,S,X:ANY)
NEWGROUP LIB;ACCESS=(R,W,A,L,S,X:ANY)
NEWGROUP SOURCE;ACCESS=(R,W,A,L,S,X:ANY)
NEWGROUP JOB;ACCESS=(R,W,A,L,S,X:ANY)
NEWGROUP USL;ACCESS=(R,W,A,L,S,X:ANY)
NEWGROUP COMPILE;ACCESS=(R,W,A,L,S,X:ANY)
NEWGROUP QUERYXEQ;ACCESS=(R,W,A,L,S,X:ANY)
Those of you involved in Native Mode development will need the following additional groups:
NMPROG 	- replaces the PROG group
NMLIB  	- replaces the LIB group
NMOBJ 	 - replaces the USL group
Alternatively these groups can be created by the FIJI jobstream MENUIMP.PUB.STANDARD, which will also copy all the relevant files into these groups.
NEWGROUP name;CAP=IA,BA,PH,DS;ACCESS=(R,W,A,L,S,X:ANY)
NEWUSER name;HOME=group;CAP=IA,BA,ND,SF,PH,DS
The groups in each development account are for the following purposes:
| COMPILE | Contains jobstreams to compile either individual units within the system, or the entire system |
| DATA | Contains the application database(s), and other data files |
| FORMS | Contains the application form file (slow and fast versions). |
| JOB | Contains jobstreams to create the message and help catalogs, and other general-purpose jobstreams |
| LIB | Contains the copy library and macro file for developing software according to the company standards |
| PROG | Contains runnable program files, as well as the message and help catalogs |
| SOURCE | Contains all the application source code and copy libraries |
| USL | Contains the output files generated by the compiler which are used to create the runnable program files |
| <name> | A development group used as the programmer's work area. All software should be developed in a programmer's group and not transferred to the SOURCE group until it is complete |
The following groups are for Native Mode development:
| NMLIB | instead of the LIB group |
| NMOBJ | instead of the USL group |
| NMPROG | instead of the PROG group |
These groups can either be in addition to the other groups, to allow concurrent development in both Compatibility and Native Mode, or as replacements for the other groups if development is in Native Mode only. It should be possible to take the same application source code and compile it in either Mode without amendment - any slight changes required by the different versions of the COBOL compiler have been isolated to the standard copy library and macro files.
The following files will need to be copied from the STANDARD account into the corresponding groups of your development account:
These files are required for Compatibility Mode development:
| STANDARD.LIB | standard copy library (COMAREA) |
| STDCAT.LIB | standard message catalog (sets 1 and 2) |
| STDHELP.LIB | standard help catalog |
| STDMACRO.LIB | standard macro file for use with COBOL85 |
| MENUSON.USL | application system driver program |
| COMPALL.JOB | compile all batch/online programs |
| USERPREP.JOB | build application program |
| USERHELP.JOB | build application help catalog |
| USERCAT.JOB | build application message catalog |
| SLPROG.JOB | build SL.PROG |
| SLPUB.JOB | build SL.PUB |
| MENU.PROG | menu program |
| MENUSON.PROG | menu son program (skeleton) |
| MENUMSG.PROG | compiled menu message catalog |
| MENUHELP.PROG | compiled menu help catalog |
| MENUSHUT.PROG | shutdown program (online) |
| MENUDOWN.PROG | shutdown program (batch) |
| SL.PROG | segmented library file |
| MENUCF.PROG | amend command file (batch) |
| MENULOAD.PROG | load data onto menu database (batch) |
| FIJIINFO.PROG | FIJI interface program |
These files are required for Native Mode development:
| STANDARD.NMLIB | standard copy library (COMAREA) |
| STDMACRO.NMLIB | standard macro file for use with COBOL85 |
| MENUSON.NMOBJ | application system driver program |
| STDRL.NMOBJ | library of standard subroutines |
| NMALL.JOB | compile all batch/online programs |
| NMPREP.JOB | build application program |
| NMHELP.JOB | build application help catalog |
| NMCAT.JOB | build application message catalog |
| NMXL.JOB | build CLOSERL.NMOBJ, CLOSEXL.NMPROG and XL.NMPROG |
| MENU.NMPROG | menu program |
| MENUSON.NMPROG | menu son program (skeleton) |
| MENUMSG.NMPROG | compiled menu message catalog |
| MENUHELP.PROG | compiled menu help catalog |
| MENUSHUT.NMPROG | shutdown program (online) |
| MENUDOWN.NMPROG | shutdown program (batch) |
| STDXL.NMPROG | run-time library file |
| MENUCF.NMPROG | amend command file (batch) |
| MENULOAD.NMPROG | load data onto menu database (batch) |
| FIJIINFO.NMPROG | FIJI interface program |
These files are common to both Compatibility Mode and Native Mode development:
| STDCAT.LIB | standard message catalog (sets 1 and 2) |
| STDHELP.LIB | standard help catalog |
| XXXMACRO.LIB | skeleton application macro file (where `XXX' should be set to your application nmemonic) |
| MENUFAST.FORMS | menu formfile |
| USERFORM.FORMS | skeleton application formfile (contains forms HEAD, HELP, HELPD and VERSION) |
| COPYLIB.SOURCE | skeleton application copy library |
| USERCAT.SOURCE | skeleton application message catalog |
| USERHELP.SOURCE | skeleton application help catalog |
| USEROPEN.SOURCE | skeleton subprogram to open user files |
| USERCALL.SOURCE | skeleton subprogram to call other modules |
| USERCLOS.SOURCE | skeleton subprogram to close user files |
| UDUMMY.SOURCE | skeleton subprogram to provide dummy entrypoints |
| MENUSC.DATA | control database schema |
| LIVECOMP.COMPILE | sample job for `live' compilations |
| TESTCOMP.COMPILE | sample job for `test' compilations |
| @.QUERYXEQ | commands to list contents of MENU database |
All jobstreams will need to be amended to log in to the correct account. Note that the FIJI job MENUIMP.PUB.STANDARD will automatically copy all files and amend all jobstreams.
If your application is going to interface with CODA-IAS there are some additional files, but these are explained in section 10 Integration with CODA-IAS.
No control database is included in the list of files to be copied from the STANDARD account, just the IMAGE schema. The database must be created and initialised for your application as follows:-
FILE DBSTEXT=MENUSC
FILE DBSLIST;DEV=LP
RUN DBSCHEMA.PUB.SYS;PARM=3
RUN DBUTIL.PUB.SYS,CREATE
>PROMEN
>EXIT
- Stand by to initialise the menu database !!
- Enter 8 character identity of Super User  : <enter identity>
- Enter 20 character name for Super User    : <enter name>
- Enter 8 character password for Super User : <enter password>
if (hpcidepth > 1) then
  echo You are not at CI depth level 1
  exit
endif
SETJCW JCW=0
CONTINUE
RUN MENU.PROG
SHOWTIME
IF JCW>0 THEN
  SHOWJCW
  SET ECHO=ON
ENDIF
A form file for your application is provided as USERFORM.FORMS, which contains the following forms:
This should be renamed as "xxxFORM" where "xxx" is the mnemonic that has been given to your particular application. All new forms should be initially copied from HEAD in order to provide the two fields that will be required in each form as the standard screen heading.
Appendix A1 shows a sample jobstream that should be used to compile this form file into a `fast' form file.
The message catalog holds lines of text that can be used for all window messages and function key labels. Application programs simply supply a message number and the standard utility software retrieves the relevant text from the catalog.
This facility allows text to be modified by changing the contents of the catalog instead of any program code. This is especially useful if an application needs to be supplied in different languages - the software remains the same, just the message catalog is different.
A sample message catalog is provided in USERCAT.SOURCE, which can be modified using any text editor. Before this can be used by the online system it must be compiled using the sample jobstream as shown in Appendix A2. Note that this job merges the application catalog with the contents of STDCAT.LIB - this is the message catalog used by the menu system itself, and contains messages that are used by the various standard utilities.
The messages within a particular catalog are divided into sets, where each set has a unique two-digit number which must be defined in ascending sequence. Individual numbers may be omitted, but should not be duplicated or defined out of sequence. As sets 1 and 2 have already been defined in STDCAT.LIB all application messages should start from set 3. If the application is comprised of several subsystems it may be advisable to allocate a different set number for each subsystem.
The messages within a particular set are identified by a four-digit number which must be defined in ascending sequence. Individual numbers may be omitted, but should not be duplicated (within the set) or defined out of sequence. It is advisable to define the message numbers in increments of 10 so that there are spare numbers available in case a new message that is similar to an existing message needs to be added at a future date.
Note that each message line begins with the ":" character and may contain up to 5 "!" characters identifying parameter values that will be supplied at run-time. The length of each supplied value must not exceed 40 characters. The length of the complete message should not exceed 72 characters otherwise it will be truncated.
Function key labels do not begin with the ":" character and must not include the "!" character. It is advised that the numbering sequence for these labels starts at a high value (eg: 5000) so that they are not intermingled with ordinary messages.
The help catalog holds pages of text that will be displayed on the screen whenever the function key labelled "HELP" is pressed. No special code is required in any application subprograms as the standard utility software takes care of everything.
A sample help catalog is provided in USERHELP.SOURCE, which can be modified using any text editor. Before this can be used by the online system it must be compiled using the sample jobstream as shown in Appendix A3.
Each page of text is identified by one of the following:-
"\ENTRY=trancode" is the 1st page for a particular transaction code."\ITEM=keyword" is an additional page for that transaction code.This is an example of how the file should look:-
\ENTRY=trancode1
......< 1st page for trancode1 >
\ITEM=keyword1
......< 2nd page for trancode1 >
\ITEM=keyword2
......< 3rd page for trancode1 >
\ENTRY=trancode2
......< 1st page for trancode2 >
\ITEM=keyword1
......< 2nd page for trancode2 >
\ENTRY=trancode3
......< etc >
Please take note of the following rules:-
"\ENTRY=" lines need not appear in any particular sequence, but should not have duplicate names."\ITEM=" statements need not appear in any particular sequence, and <keyword> may be duplicated within different "\ENTRY=" names.NOTE: If any help text is required for application transactions of type "ME" (menu) or "JS" (jobstream) it must be merged into the file being accessed by the Menu program itself (MENUHELP.PROG) as the application help catalog is only accessed when executing a transaction of type "SP" (subprogram).
All files which are to be used by the application must be defined in the USERLINK entry of copylibrary COPYLIB.SOURCE. Sample definitions for each type of file are explained below:
 03  <base>-BASE-NAME           PIC X(28).
 03  <base>-PASSWORD            PIC X(16).
 03  <base>-BASE-FLAG           PIC X(01).
     88  <base>-BASE-OPEN       VALUE "Y".
     88  <base>-BASE-CLOSED     VALUE "N"," ".
 03  <base>-BASE-LOG-FLAG       PIC X(01).
     88  <base>-BASE-LOGGING-ON VALUE "Y".
 03  F                          PIC XX.
03 <form>-FORMFILE-NAME PIC X(36).
 03  <ksam>-FILETABLE.
     05  <ksam>-FILENUMBER      PIC S9(4) COMP.
     05  <ksam>-FILENAME        PIC X(08).
     05  <ksam>-I-O-TYPE        PIC S9(4) COMP.
     05  <ksam>-ACCESS-MODE     PIC S9(4) COMP.
     05  <ksam>-PREV-OP         PIC S9(4) COMP.
 03  <ksam>-RECSIZE             PIC S9(4) COMP SYNC.
 03  <ksam>-FILE-FLAG           PIC X(02).
     88  <ksam>-FILE-OPEN       VALUE "Y".
     88  <ksam>-FILE-CLOSED     VALUE "N"," ".
 03  <ksam>-KEYLOC              PIC S9(4) COMP SYNC.
 03  <ksam>-KEYLEN              PIC S9(4) COMP SYNC.
 03  F                          PIC XX.
Each occurrence of <base>/<form>/<ksam> will be used as the prefix to a data item, therefore must be unique for each file type.
Initial values for these data items must be created using MOVE statements within the USEROPEN routine.
If additional data items need to be added to the USER-LINKAGE area during the life of the application they can be appended to the existing area without the need to recompile any existing programs.
NOTE: The total length of USER-LINKAGE must not exceed 1024 bytes.
USEROPEN will be called by MENUSON immediately before the first application subprogram to be selected by the user. The skeleton version (included in the setup procedure) must be amended so that paragraph A-10-SETUP moves initial values into the USER-LINKAGE area, and paragraph A-20-OPEN actually opens the files, as in the following examples:
 A-10-SETUP.

* The application version number [will appear in every screen]
    MOVE "xx.xxx.xxx"            TO MENU-VERSION.

* Values for database <base> [note the 1st 2 characters are spaces]
    MOVE "  xxxDB.DATA"          TO <base>-BASE-NAME.
    MOVE "password"              TO <base>-PASSWORD.
    MOVE "N"                     TO <base>-BASE-FLAG.

* Identity of application formfile
    MOVE "xxxFAST.FORMS"         TO <form>-FORMFILE-NAME.

* Values for ksam file <ksam>
    MOVE "ksamname"              TO <ksam>-FILENAME.
    MOVE "N"                     TO <ksam>-FILE-FLAG.
    MOVE n                       TO <ksam>-I-O-TYPE.
    MOVE n                       TO <ksam>-ACCESS-MODE.

 A-20-OPEN.

* Open message catalog
    %OPENUSERMSG(A-20#,xxxMSG#).

* Open help catalog
    %OPENUSERHELP(A-20#,xxxHELP#).

* Open form file <form>
    %OPENUSERFORM(A-20#,<form>#).

* Open database <base>
    %DBOPEN(A-20#,<base>#).

* Open ksam file <ksam>
    %CKOPEN(A-20#,<ksam>#).
    or
    %CKOPENSHR(A-20#,<ksam>#).
USERCLOSE will be called automatically by MENUSON when the user returns to the Menu logon screen, or by the UERROR routine if any fatal errors are detected. The version (included in the setup procedure) must be amended so that paragraph A-10 closes each of the application files as follows:
 A-10.

* Close form file
    %VCLOSEFORM(A-10#).

* Close database <base>
    %DBCLOSE(<base>#).

* Close ksam file <ksam>
    %CKCLOSE(A-10#,<ksam>#).

* Close message catalog
    %CLOSEUSERMSG(A-10#).
NOTE: As UERROR contains a call to USERCLOSE there must be no code inside USERCLOSE that calls UERROR, otherwise a loop could occur.
Before any subprogram can be selected from the Menu system it must be defined as a transaction on the Menu database. To do this you must use the following transactions on menu MENU1:
FILE <userform>=<file.group>
FILE <usermsg>=<file.group>
FILE <userhelp>=<file.group>
FILE <userbase>=<file.group>
RUN <userprog.group>;LIB=G
There should be one FILE statement for each file identified in the USEROPEN routine. The RUN statement identifies the program file which contains all the online subprograms for the application.
Transaction Code - must not already existEntrypoint - set to subprogram/entrypoint name (need not be the same as the transaction code)Transaction Description - free formatTransaction Group - must already exist (see above)Transaction type - must be "SP" (subprogram)The MENUSON program will invoke a user module by calling the generic USERCALL routine which must therefore be amended to contain references to every module within the application. Each of the application subprograms will be invoked via a statement of the form:
CALL "entrypoint" USING COMMON-LINKAGE, USER-LINKAGE.
The skeleton USERCALL routine must therefore be amended to contain a separate CALL statement for each of these application subroutines, in the following places:
The entries in this table MUST be defined in alphabetic sequence, otherwise the SEARCH verb may not locate the entry.
Do not forget to alter the number of entries on the OCCURS clause.
A-20-CALL:
The "GO TO ..... DEPENDING ON" statement must be amended to include a paragraph name of the format "A-<entrypoint>", where entrypoint names must be defined in alphabetic sequence.
A-40-MODULES:
Use the %CALLPROG(entrypoint#) macro for each entrypoint, again in alphabetic sequence.
If an application module name is added to the list within USERCALL the resulting CALL statement will produce an UNRESOLVED PROG EXTERNAL error until such time as the module has been written and is available to be included within the PREP of the program file. As there is usually a time delay between a module being identified and the code being available this could cause a problem. One solution is to generate a dummy entrypoint which can be used until such time as the actual code is available - this is where UDUMMY comes in.
For each "%CALLPROG(module#)" statement within USERCALL there must be a corresponding "%CALLPROG(module#)" statement within UDUMMY - the difference being the definition of the %CALLPROG macro within the two subprograms:-
CALL "module" USING COMMON-LINKAGE, USER-LINKAGE.
ENTRY "module" USING COMMON-LINKAGE, USER-LINKAGE.
All that UDUMMY does (if called using any one of its entrypoints) is to load the following message into the window line:-
"020060:Transaction <name> (<entrypoint>) is unknown to system"
To avoid the problem of maintaining two separate lists of module names it is possible to keep a single list in a file which can be incorporated into both USERCALL and UDUMMY by means of an $INCLUDE statement. This file need contain nothing more than a simple list of %CALLPROG(module#) statements.
 |
In Native Mode development the UDUMMY module must reside only in file CLOSEXL.NMPROG, and not RL.NMOBJ or XL.NMPROG. |
| In Compatibility Mode development it is not possible to include the UDUMMY module in either SL.group or SL.PUB as it would overwrite the actual entrypoint names, therefore its use is redundant. |
See Appendix A7 for an example of the jobstream which is required to compile an online program within a development group.
This compiles into temporary file $NEWPASS (which becomes $OLDPASS), then transfers all the relevant segments into file SL.<group>. There is no PREP statement to create a new program file.
The file COBCNTL.PUB.SYS is redirected to CMDEV.COBCNTL.SYS, which includes the BOUNDS option on the $CONTROL statement. This causes the compiler to generate extra code to check that any subscript / index / reference-modification is within bounds.
The COBOL statement includes the INFO string "$SET X1=ON", which has the following effect:
%ED macro includes the WITH DEBUGGING MODE clause on the SOURCE-COMPUTER statement within the ENVIRONMENT DIVISION. This "enables" any statement which has the character "D" in column 7, instead of treating them as comment lines.%DEBUG macro will generate code for the debugging procedure in the DECLARATIVES section. This code will be ignored unless the program is run with the ";PARM=1" option.The menu command file entries for the transaction group which has been allocated to your application should be similar to the following:
$IF TEST=1
    FILE TRACER;DEV=LP,1
    RUN MENUSON.PROG;LIB=G;PARM=1;STDLIST=*TRACER
$ELSE
    RUN xxxPROG.PROG;LIB=G
$ENDIF
In order to access the software under test it is therefore necessary to set the jcw TEST to 1 before running the program. This forces the first of the two RUN statements to be used, which has the following effect:
"PARM=1" option will turn on the display statements contained within the %DEBUG macro."STDLIST=*TRACER" option will output these statements to a deferred spool file instead of the terminal. Note that any other display statements (eg: those produced by pressing the HELP function key) will also be directed to this deferred spool file."CALL <dataname>" construct which uses the LOADPROC intrinsic to load the selected module from an SL file whenever that module is selected. SL files will be examined in the following sequence:
The selected module must therefore exist in one of these SL files - as we do NOT allow changes to SL.PUB.SYS it must be one of the other two. If it exists in more than one file the first one encountered during a search will be used.
If the selected module contains calls to other routines (eg: UERROR, SAVINITFORM, or application routines) these must also reside in one of these SL files. You should also be aware that if the LOADPROC intrinsic cannot find what it is looking for in the first of these SL files it begins looking in the second and cannot return to the first SL file. Thus if module A is in file SL.group and module B is in file SL.PUB and module B contains a call to module A, the search will be unsuccessful and the LOADPROC will fail with the equivalent of an "UNRESOLVED PROG EXTERNAL <name>".
It is normal practice to build SL.PUB to contain all the standard utility modules plus all the available application modules using the sample jobstream in Appendix A6. Thus the SL file in the programmer's group need contain no more than the actual module(s) being tested.
Note that this version of SL.PUB is not delivered to the client as it is used for development purposes only.
If the software is run without jcw TEST being set to 1 then the second of the two RUN statements will be used. This will not be able to access any modules within the programmer's SL file.
If a module which does not exist in any of these SL files is selected the program will abort with the following messages:-
**** PROGRAM ERROR #18:
PROCESS QUIT .PARAM = 41  < loader error: procedure not found >
Summary of file usage:
| 1. MENUSON.PROG | Driver program, with dummy USERCALL |
| 2. SL.PROG | USEROPEN and USERCLOSE |
| 3. SL.<group> | Module(s) under development |
| 4. SL.PUB | All application modules and standard utility routines (excluding USERCALL) |
As soon as a programmer has completed a module the following steps should be taken:
BOUNDS option), and does not set the compile-time switch X1 (which turns off any DEBUG statements).AUXUSL/COPY statement for each module within the system. It may also include any NEWSEG statements to reduce the total number of segments, if required.
Note that the file MENUSON.USL contains all the standard utilities so that the resulting program file can be run without the need for a separate run-time library. The only software that should reside in an SL file is third party software, eg: CODA-IAS routines.
See Appendix A14 for an example of the jobstream which is required to compile an online program in a development group.
This compiles into temporary file $NEWPASS (which becomes $OLDPASS), then transfers the module into file XL.<group>. There is no LINK statement to create a new program file.
The file COBCNTL.PUB.SYS is redirected to NMDEV.COBCNTL.SYS, which includes the BOUNDS option on the $CONTROL statement. This causes the compiler to generate extra code to check that any subscript / index/ reference-modification is within bounds. This also uses the VALIDATE option to include extra code to check for illegal ASCII digits.
The COBOL statement includes the INFO string "$SET X1=ON", which has the following effect:
%ED macro includes the WITH DEBUGGING MODE clause on the SOURCE-COMPUTER statement within the ENVIRONMENT DIVISION. This "enables" any statement which has the character "D" in column 7, instead of treating them as comment lines.%DEBUG macro will generate code for the debugging procedure in the DECLARATIVES section. This code will be ignored unless the program is run with the ";PARM=1" option.The menu command file entries for the transaction group which has been allocated to your application should be similar to the following:
$IF TEST=1
    FILE TRACER;DEV=LP,1
    RUN MENUSON.NMPROG;PARM=1;STDLIST=*TRACER:XL="XL.%group,XL,STDXL,CLOSEXL"
$ELSE
    RUN xxxPROG.NMPROG
$ENDIF
In order to access the software under test it is therefore necessary to set the jcw TEST to 1 before running the program. This forces the first of the two RUN statements to be used, which has the following effect:
"PARM=1" option will turn on the display statements contained within the %DEBUG macro."STDLIST=*TRACER" option will output these statements to a deferred spool file instead of the terminal. Note that any other display statements (eg: those produced by pressing the HELP function key) will also be directed to this deferred spool file."CALL <dataname>" construct which uses the LOADPROC intrinsic to load the selected module from an XL file whenever that module is selected. XL files will be examined in the sequence defined on the ";XL=" list parameter. If these file names do not include group and/or account names it will be assumed that these files reside in the same group and account as the program on the RUN statement. Note that the menu system will convert "%group" to the user's logon group.The selected module must therefore exist in one of these XL files. If it exists in more than one file the first one encountered during a search will be used.
If the selected module contains calls to other routines (eg: UERROR, SAVINITFORM, or application routines) these must also reside in one of these XL files. You should also be aware that if the LOADPROC intrinsic cannot find what it is looking for in the first of these XL files it begins looking in the second, third, fourth, etc and cannot return to a previous XL file. Thus if module A is in file (1) and module B is in file (2), and module B contains a call to module A, the search will be unsuccessful and the LOADPROC will fail with the equivalent of an "UNRESOLVED PROG EXTERNAL <name>".
It is normal practice to build XL.NMPROG to contain all the available application modules using the sample jobstream in Appendix A13. File STDXL.NMPROG contains all the standard utility software. File CLOSEXL contains a copy of USERCLOSE and IASERROR as the call from UERROR to USERCLOSE cannot go back from file STDXL to file XL to be satisfied, and the call from USERCLOSE to IASERROR cannot go back from file CLOSEXL to file STDXL to be satisfied.
Thus the XL file in the programmer's group need contain no more than the actual module(s) being tested.
If the software is run without jcw TEST being set to 1 then the second of the two RUN statements will be used. This will not be able to access any modules within the programmer's XL file.
If a module which does not exist in any of these XL files is selected (including the dummy entrypoints in CLOSEXL) the program will abort with the following message:-
Dynamic loading unresolved external: (LDRERR 103)
Summary of file usage:
| 1. MENUSON.NMPROG | Driver program |
| 2. XL.<group> | Module under development |
| 3. XL.NMPROG | Remainder of application modules (including USERCLOSE) |
| 4. STDXL.NMPROG | Standard utility routines (including UERROR, IASERROR) |
| 5. CLOSEXL.NMPROG | USERCLOSE, IASERROR, UDUMMY |
As soon as a programmer has completed a module the following steps should be taken:
BOUNDS and VALIDATE options, but includes the OPTIMIZE=1 option), and does not set the compile-time switch X1 (which turns off any DEBUG statements).LINK statement will be included.
The resulting program file will contain all application modules from file RL.NMOBJ and all standard utility routines from file STDRL.NMOBJ, therefore no additional XL files will be required at runtime (unless the application requires any third party routines, eg: IASLINK).
It is assumed that all batch programs will be called from jobstreams which are defined on the menu database, and not from data files which can be initiated by the STREAM command by anyone who has access to the MPE prompt.
In order to create a jobstream on the menu database the following transactions from menu MENU1 should be used:
"IN=days,hours,minutes", "AT=hh:mm:ss") can be defined in the ENTRYPOINT field."!JOB" and the last line must be "!EOJ". It is possible for certain parameter values to be inserted into the jobstream before it is streamed - these are documented fully in the MENU Functional Specification.See Appendix A9 for an example of the jobstream which is required to compile a batch program within a development group.
This compiles into temporary file $NEWPASS (which becomes $OLDPASS), then creates a program file which can be initiated by a RUN command. Note that the program must be run with the ;LIB=G parameter in order to satisfy any calls to external subroutines. These are not included with the RL= parameter on the PREP statement due to the fact that all routines extracted from the library file would be merged into a single segment, and if the size limit for a single segment were to be exceeded the prep would fail.
The file COBCNTL.PUB.SYS is redirected to CMDEV.COBCNTL.SYS, which includes the BOUNDS option on the $CONTROL statement. This causes the compiler to generate extra code to check that any subscript / index / reference-modification is within bounds.
The COBOL statement includes the INFO string $SET X1=ON, which has the following effect:
%ED macro includes the WITH DEBUGGING MODE clause on the SOURCE-COMPUTER statement within the ENVIRONMENT DIVISION. This "enables" any statement which has the character "D" in column 7, instead of treating them as comment lines.%DEBUG macro will generate code for the debugging procedure in the DECLARATIVES section. This code will be ignored unless the program is run with the ";PARM=1" option.The RUN command within the menu command file should refer to the program file within the programmer's group, with the ";PARM=1" option if required.
As soon as a programmer has completed a batch program the following steps should be taken:
BOUNDS option), and does not set the compile-time switch X1 (which turns off any DEBUG statements).;LIB=G option is still required in order to reference any standard utility routines within SL.PROG (and IASLINK routines from SL.PUB). It may be preferred to exclude the need to reference SL.PROG by copying all the relevant modules into the USL file before it is prepped.See Appendix A16 for an example of the jobstream which is required to compile a batch program within a development group.
This compiles into temporary file $NEWPASS (which becomes $OLDPASS), then creates a program file which can be initiated by a RUN command. Note that the LINK statement includes the "RL=" and "XL=" options to include any routines from library files, therefore no other options are required on the RUN statement.
The file COBCNTL.PUB.SYS is redirected to NMDEV.COBCNTL.SYS, which includes the BOUNDS option on the $CONTROL statement. This causes the compiler to generate extra code to check that any subscript / index / reference-modification is within bounds. This also uses the VALIDATE option to include extra code to check for illegal ASCII digits.
The COBOL statement includes the INFO string $SET X1=ON, which has the following effect:
%ED macro includes the WITH DEBUGGING MODE clause on the SOURCE-COMPUTER statement within the ENVIRONMENT DIVISION. This "enables" any statement which has the character "D" in column 7, instead of treating them as comment lines.%DEBUG macro will generate code for the debugging procedure in the DECLARATIVES section. This code will be ignored unless the program is run with the ";PARM=1" option.The RUN command within the menu command file should refer to the program file within the programmer's group, with the ";PARM=1" option if required.
As soon as a programmer has completed a batch program the following steps should be taken:
BOUNDS and VALIDATE options), and does not set the compile-time switch X1 (which turns off any DEBUG statements).The format of all version numbers is "VV.CCC.FFF" where:
| VV | Is a two-digit number, starting at "01" that represents the initial version number. |
| CCC | Is a three-digit number, starting at "000" that represents the number of changes made to the current version. |
| FFF | Is a three-digit number, starting at "000" that represents the number of bug-fixes included in the current version. |
The starting version number should therefore be "01.000.000".
The CCC portion should be incremented each time a change is included, and the FFF portion should be incremented each time a bug-fix is included. Thus a version number of "01.005.003" would indicate that the program has undergone 5 changes and 3 fixes.
If a module is changed significantly (ie: redesigned or rewritten) then the VV portion should be incremented and the CCC/FFF portions reset to zero. Thus "01.005.003" would become "02.000.000".
Each application has its own copy of the %VERSION macro contained in file xxxMACRO.LIB (where "xxx" should be changed to the 3-character mnemonic defined for that particular application).
This macro should be modified to contain the current version numbers for the formfile and each application database (up to 4 different databases). If compile-time switches are used (other than X1) then different characters may be defined to indicate that a particular switch was turned ON for a particular compilation.
The %VERSION macro should be included in every module (online and batch) within the system. For online modules this should be the first statement in the PROCEDURE division, for batch programs this statement should be immediately after the %BATCHINIT macro.
The %VERSION macro should be defined in your source code as follows:
%VERSION(progid#,version#,fixno#)where
| progid | = the program/module identity (8 characters) |
| version | = the program version number (format "VV.CCC.FFF") |
| fixno | = the Change Request / Fix number (5 characters) |
Each Change Request or Fault Report should be submitted on a document which has a unique reference number, eg: "CRnnn" or "FRnnn". When amending any program via QEDIT this identification number should be written into columns 73/80 of all affected source lines by using the command `SET X "CRnnn"', and this same identification number should be defined as the third parameter to the %VERSION macro.
As changes are made to the formfile or database(s) the relevant version numbers within the %VERSION macro should be updated, then the entire system recompiled so that this updated macro is incorporated into every program. The version print routine can then be run in order to confirm that each module has been successfully recompiled and integrated into the live program file.
The application formfile should contain a dummy form called VERSION containing the following fields:
| VERSION | - 10 characters, the current formfile version number |
| DATE | - 8 characters, the date of the last change |
| LANG | - 8 characters, the language of the file |
These fields will be interrogated whenever the online version print routine is run.
The rest of the screen should contain a brief history of amendments, which can be displayed at any time by running program ENTRY.PUB.SYS provided that this form is nominated as the head form on the globals menu.
When this screen has become full a continuation screen can be created (eg: VERSION2) without the need for the three data fields. This should be nominated as the next screen in the definition of VERSION so that it can be displayed when running the ENTRY program. You may either have a separate version number for the formfile, or set it to the corresponding version number of the associated software release - this may make it easier to determine that the formfile is compatible with a particular release of the software.
When the version print routine is run this form will be accessed so that the details can be included in the print file.
The formfile version number must also be amended in file xxxMACRO.LIB by changing the following line:
MOVE "XX.XXX.XXX" TO VSN-FORM-VERS
If your database contains a single control record it would be useful to add a new data item to contain the current version number of that database. This data item should be displayed on the control record maintenance screen, but should only be amended within the jobstream that implements any database changes (eg: by appending the QUERY commands to FIND and REPLACE the version number with the new value).
This version number will be interrogated whenever the online version print routine is run.
If your database does not contain a suitable control record on which to hold this version number then the value will have to be hard-coded in the USERCALL routine.
The database version numbers must also be amended in file xxxMACRO.LIB by changing the following lines:
MOVE "XX.XXX.XXX"  TO VSN-DB-VERS (1)
MOVE "XX.XXX.XXX"  TO VSN-DB-VERS (2)
MOVE "XX.XXX.XXX"  TO VSN-DB-VERS (3)
MOVE "XX.XXX.XXX"  TO VSN-DB-VERS (4)
Note: If there is only one application database then lines 2, 3 and 4 should be commented out.
Code must be entered into the following parts of the online system in order for the version checking routine to function correctly:
MOVE "XX.XXX.XXX" TO MENU-VERSION.This value will be displayed in every online screen in the second line of the standard heading after the transaction code. It will also be used when running the version print routine.
%VERSION macro as the very first statement within the procedure division. This will do nothing unless the module is called with the VERSION-CHECKING-ON condition set to TRUE, in which case it will move values into the print line (which is defined within COMMON-LINKAGE) then exit without performing any other processing.There is a transaction within the menu system called VERSION. When selected it will produce a print file (with the name "VERSION") which will show the following:
It will also produce a similar print file for each of the application subsystems defined on that copy of the menu database. This is done by setting the VERSION-CHECKING-ON condition to TRUE before passing control to the application son program. When this condition is set the following sequence of events takes place:
If any module does not contain the %VERSION macro it will proceed as normal (ie: display a screen and wait for user input), therefore the version printing routine should be tested early on in the development of the application.
It should become standard practice to produce a new copy of the VERSION print file before each delivery to the client. This should be checked to ensure that the delivery contains everything that it is supposed to contain. This print file can also be produced by the client to verify that they are running the latest version of the system.
Each batch program should contain the %VERSION macro immediately after the %BATCHINIT macro. This will cause the program to display its version details on the $STDLIST file before continuing with its normal processing.
If the jcw NORUN is set to a non-zero value the %VERSION macro will stop after displaying its details. It will therefore be possible to construct a jobstream which sets this jcw before running each of the batch programs - this will produce a list of all the version details for the batch programs without doing any batch processing.
The following values in COMMON-LINKAGE are set by the menu program:
| MENU-OPERATOR | The logon user identity. |
| MENU-COMPANY | The logon company identity. |
| MENU-USER-GROUP | The user group for this user. |
| MENU-PRINTER-ID | The user's default printer. |
| MENU-SELECTION | The current transaction. |
| MENU-ENTRY-POINT | The entry point for the current transaction. |
| MENU-HEADING-1 | 1st line of the standard screen heading. |
| MENU-HEADING-2 | 2nd line of the standard screen heading. |
| MENU-TODAY | Today's date in CCYYMMDD format. |
| MENU-TRAN-LEVEL | = 1 if current transaction was selected from a menu. > 1 if selected via the AUTO-SELECT mechanism. |
| MENU-AUTO-SELECT | This is always blank upon entry, but may be changed to the identity of the next transaction, avoiding the need to process a menu screen to obtain the next selection. Note that this field will not be actioned until the current transaction exits back to the menu program. |
| MENU-AUTO-RETURN | If the current transaction was selected via the AUTO-SELECT mechanism this will contain the id of the transaction where the selection was made (ie: the previous transaction), otherwise it will be blank. |
Avoid writing functions that amalgamate add/change/delete/enquire modes otherwise it will be difficult to give a user enquiry-only abilities at a later stage. Each of these modes should be contained within an independent function, thus allowing all security checking to be performed by the menu program, and not within user modules.
This may mean that some code is duplicated, but it does isolate the code for each mode into a separate function which is therefore easier to maintain.
The only reason for allowing a multi-mode function is for something like a simple code file maintenance transaction that will be used rarely, and then only by one or two senior users.
Avoid writing functions which use multiple screens. A single-screen function is easier to maintain, and the OTHER-OPTIONS facility allows the user to flip between screens just as if they are being processed by a single function.
As well as holding the communication areas for each of the application files, the USER-LINKAGE area can also be used to store other values that can be passed from one application module to another. If, for example, several modules start by requesting a data item called ACCOUNT-NUMBER so that they can retrieve a record from the database for further processing, then this data item can be declared in the USER-LINKAGE area. It then becomes possible for the user to select a particular value using one transaction, then to progress through other transactions which will use this value without forcing the user to re-enter it each time. This can be achieved using the following code:
 B-10-INIT.

    %SAVINITFORM(B-10#,<form>#).
    MOVE SPACES TO <form buffer>.
    IF LINK-ACCOUNT-NUMBER <code to test for a valid value>
        MOVE LINK-ACCOUNT-NUMBER TO <form>-ACCOUNT-NUMBER
    END-IF.
    %VPUTBUFFER(B-10#,<form>#).

 B-20-ACCEPT.

    %ACCEPTENTER(B-20#).
    ....function key processing

 B-30-VALIDATE.

    PERFORM BA-VALIDATE-SELECTION.
    IF VEDIT-ERRORS
        GO TO B-20-ACCEPT
    END-IF.
    MOVE <form>-ACCOUNT-NUMBER TO LINK-ACCOUNT-NUMBER.
Please note the following:
It is quite common in a system for a user to start at a particular transaction, select a value, then use the OTHER OPTIONS mechanism to pass control to another transaction which requires the same value. It is nice that the system passes the value from the first to the second transaction without the user having to key it in again, but it becomes rather tedious for the user to keep pressing the ENTER key before the second transaction will accept and process that value. This can be avoided by inserting the following code:
    ..........
    %VPUTBUFFER(B-10#,<form>#).
    IF MENU-AUTO-RETURN <> SPACES             <<--
        IF <form>-ACCOUNT-NUMBER <> SPACES    <<--
            GO TO B-30-VALIDATE               <<--
        END-IF                                <<--
    END-IF                                    <<--

 B-20-ACCEPT.

    %ACCEPTENTER(B-20#).
    ...function key processing

 B-30-VALIDATE.
    ..........
Please note the following:
It is possible to have a transaction which does not perform any screen processing. This may be for one of two reasons:
If, in either case, a message is loaded into the window line before the program exits this message will be carried forward to the next transaction.
However, if the program exits without loading a message into the window line MENUSON will load the standard "PROCESSING - PLEASE WAIT" message with the blink option set. This causes the whole of the current screen (not just the window line) to be redisplayed, but as there is NO current screen it causes a corruption which appears on the next screen. This problem can be avoided by inserting the following line before the EXIT PROGRAM/GOBACK statement in the program which has no screen processing:
SET VIEW-BLINKMSG-IGNORE TO TRUE
If a batch program requires a parameter value before it can continue with its processing it is normal practice to acquire this from the $STDIN file by means of the ACCEPT <dataname> verb.
However, when examining the $STDLIST output produced by the jobstream it is not possible to see what parameters were requested or the values that were provided. This could be inconvenient when trying to track down a possible problem. This information can be made apparent by using the following code:
DISPLAY "Enter parameter value: " NO ADVANCING.
ACCEPT dataname.
DISPLAY dataname.
The DISPLAY statement should always be employed to cater for those circumstances in which the program may be initiated from within an online session instead of a jobstream - it is rather frustrating if the program waits for you to key in some data without telling you what it wants beforehand.
It is defined in the standards that no transaction should pass control to another transaction by a hard-coded CALL statement as this could lead to stack problems and uncontrolled system aborts. Instead the recommended procedure is to use the AUTO-SELECT mechanism to exit the current transaction before passing control to the next transaction, eventually returning to the first transaction.
This removes the possibility of stack overflows as each transaction's working storage is released before the next transaction is loaded. However, when returning to a transaction its processing cannot resume from where it left off, it must always start from the very beginning.
This is not too much of a problem if the transaction's screen contains details from a single entity as the transaction is able to skip the initial user response and reload the screen details from the key value which is held is USER-LINKAGE. This gives the appearance that the transaction was resumed from its previous execution, even though it actually did not.
The problem arises when a screen is constructed from several entities, typically an enquiry screen that shows multiple pages of details. When the user returns to that screen he will want it to resume from the previously selected page, not restart from the first page. This problem can be solved by using the USCREENIN/USCREENOUT procedures.
| USCREENOUT | Will copy a designated portion of the program's working storage area to a temporary disk file which uses the transaction code as its file name. This should be the last step in the transaction before it exits and passes control to the next transaction via the AUTO-SELECT mechanism. |
| USCREENIN | Will transfer the contents of this temporary file back into working storage, thus restoring all previous values, then delete the file. This should be the first step in the transaction before it performs any screen processing. Because the program will be starting from the very beginning it must contain code to recognise that it should resume from a later point, and proceed to that particular point. |
 |
As these routines use temporary disk files which have the same names as transaction codes the application modules SHOULD NOT USE ITS OWN TEMPORARY FILES WITH THE SAME NAMES. |
Jobstreams are defined on the menu database as transactions of type "JS", with the contents of the job being defined on the command file. When that transaction code is selected a standard screen is processed which displays any parameter prompts found inside the jobstream and accepts the user's reply. The replies are then inserted into the job, which is then streamed.
If this standard processing is not sufficient for a particular task then the standard screen which is built into the menu system can be replaced by an application module with a customised screen. The following routines are available to assist in this exercise:
| USTREAMFIND | Copies the jobstream from the menu command file into a temporary disk file ($OLDPASS), and places any prompts for parameters in the USTREAM-AREA. These prompts can then be loaded into the screen before it is displayed |
| USTREAMVALIDATE | Will validate the printer identity and user input (if validation specifications have been defined in the jobstream) |
| USTREAMXEQ | Will replace the parameter prompts in $OLDPASS with the user's replies and stream the job |
Within an online function that uses a VPLUS screen there is a facility that enables the user to select his next transaction without having to exit back to a menu screen. This is done by calling USELECT to display a list of options on the function key labels. The user selects one of the options by pressing the relevant function key, and the associated transaction code is loaded into MENU-AUTO-SELECT. This will be processed as soon as the current transaction exits back to the menu program.
The options to be displayed are defined on the D-OTHER-OPTIONS dataset of the menu database (maintained by transaction MGR12) where the key value is the identity of the transaction code. Up to 18 different options may be defined, each consisting of a LABEL and a CODE. This mechanism enables the list of options to be varied without having to make changes to any program code.
It is usual to set aside a function key at certain points within the program, and to give it the label "OTHER OPTIONS". This allows the user to decide for himself when to invoke the selection mechanism.
Since the majority of our application systems interface with CODA-IAS the following additional files will be needed in the development environment:
| IASLIB.LIB | A file of additional copy library entries that must be copied into COPYLIB.SOURCE. As this is held in copylib format the whole file can be copied in a single operation without individual modules being loaded one at a time. |
| IASMACRO.LIB | A file of additional COBOL macros that contain the calls to the various IASLINK routines. |
| IASERROR | A utility routine that will append the contents of the IAS communication area to the error diagnostics in the event of an error. For Compatibility Mode systems this is contained within MENUSON.USL and SL.PROG, and for Native Mode systems it is contained within STDRL.NMOBJ, CLOSERL.NMOBJ, STDXL.NMPROG and CLOSEXL.NMPROG. |
This file contains the following modules:
| IASLINK1 | Contains the IAS communication area which must be included in USER-LINKAGE so that it is available to all application modules. |
| IASLINK2 | Contains the additional communication areas required by PUTENTRIES, to be included only in the relevant modules. |
| IASNADIN | Additional area used by the NADIN routines. |
| LEDREP | File layout for the LEDREP data file. |
| NOMREP | File layout for the NOMREP data file. |
| SUBKSAM | file layout for the SUBKSAM data file. |
| IASxx | Additional entries for each of the IAS datasets, only required when accessing the database directly WITHOUT using any standard IASLINK routine. There is one entry for each dataset (where "xx" is the dataset mnemonic) containing the definitions that are required by the COBOL macros. |
This file contains macros for all of the IASLINK routines, and some additional macros which perform direct access on the IAS database.
NOTE: Even if all accesses are direct (ie: not via any IASLINK routines) the %OPENIAS macro MUST be used to open the database in order to set the relevant values in the IASLINK1 communication area.
After calling any of the IASLINK routines one of the following values will be set in IAS-PARAM-ERROR:
| IAS-OK | The call was successful. |
| IAS-ERROR | An error was found. The error text will be loaded into the window line prefixed by "IASnnnn:" (where "nnnn" is the error number) and the VEDIT-ERRORS condition will be set. The application module must therefore check for this condition and deal with it accordingly. |
| IAS-FATAL-ERROR | A fatal error was encountered. The error text will be loaded into the window line and the system will abort by calling UERROR. This calls USERCLOSE which in turn calls IASERROR to append the IAS details to the error diagnostics. |
The IAS communication area IASLINK1 must be initialised before any action takes place. As this area must be included within the application's USER-LINKAGE area this will be taken care of by the INITIALIZE USER-LINKAGE statement.
The following statements can either be included within the USEROPEN routine, or included within the initial section of every application module that references the IAS database:
    IF IAS-OPEN-ARRAY = SPACES
        MOVE MENU-COMPANY     TO IAS-COMPANY
        MOVE 1                TO IAS-MODE
        MOVE MENU-OPERATOR    TO IAS-INITIALS
        %OPENIAS(Para#)
        IF IAS-ERROR
            GOBACK
        END-IF
    END-IF.
The following macros should be inserted into the USERCLOSE routine:
| %PRINTIASERROR | To include IAS details on the error diagnostics (only if an IAS error has occurred). |
| %CLOSEIAS(Para#) | To close the IAS database (if it is open). |
Even though it is possible to include all of the IASLINK routines in each program at the PREP (or LINK) stage this MUST be avoided as new releases of these routines (either bug fixes or new versions) could not be referenced by the application without the need for a re-PREP. It is for this very reason that CODA provide run-time libraries.
For Compatibility Mode systems the correct SL file from the IAS account must be loaded into the PUB group of the application account. All programs must therefore include the ";LIB=G" or ";LIB=P" option in order to reference this SL file. It will therefore be the client's responsibility to ensure that this SL file is replaced whenever a new release of IAS is loaded.
For Native Mode systems there is no need to copy any files into the application account as native mode libraries can be referenced across different accounts. The RUN statement for each program must contain the option ;XL="IASXL.XLRL.IASVn" to identify the native mode library to be referenced. There will be no need to change this option UNLESS a new library file is created with a different name, or exists in a different group or account.
!JOB  FORMCOMP,MGR.account,FORMS;OUTCLASS=,1
!TELL MGR.account; FORMFILE COMPILATION IN PROGRESS
!RUN FORMSPEC.PUB.SYS
FILE xxxFORM
FORMS
COMPILE INTO NEWFAST
EXIT
!SHOWJCW
!IF FORMSPECERRORJCW <> 0 THEN
!   TELL MGR.account; FORMFILE HAS ERRORS !!!!!!!!!!!!!!!!
!ELSE
!   TELL MGR.account; FORMFILE COMPILATION COMPLETE
!   PURGE xxxFAST
!   RENAME NEWFAST,xxxFAST
!ENDIF
!EOJ
!JOB USERMSG,MGR.account;OUTCLASS=,1
!COMMENT *************************************************************
!COMMENT * Rebuild user message catalog
!COMMENT *************************************************************
!TELL @.account; RECREATING USER MESSAGE CATALOG
!PURGE xxxxCAT.PROG
!IF CIERROR=384 THEN
!  TELL @.account; FILE xxxxCAT.PROG IN USE - CANNOT BE PURGED
!ELSE
!  PURGE TEMPCAT.SOURCE
!  EDITOR
JOINQ STDCAT.LIB
JOINQ xxxxCAT.SOURCE
KEEP TEMPCAT.SOURCE
EXIT
!  FILE INPUT=TEMPCAT.SOURCE
!  FILE CATALOG=xxxxCAT.PROG
!  RUN MAKECAT.PUB.SYS
!  SAVE xxxxCAT.PROG
!  PURGE TEMPCAT.SOURCE
!  TELL @.account; FILE xxxxCAT.PROG CREATED
!ENDIF
!EOJ
!JOB USERHELP,MGR.account;OUTCLASS=,1
!COMMENT *************************************************************
!COMMENT * Rebuild user HELP catalog
!COMMENT *************************************************************
!TELL @.account; RECREATING HELP CATALOG
!PURGE xxxHELP.PROG
!IF CIERROR=384 THEN
!  TELL @.account; FILE xxxHELP.PROG IN USE - CANNOT BE PURGED
!ELSE
!  PURGE TEMPHELP.SOURCE
!  EDITOR
JOINQ xxxHELP.SOURCE
ADD
\ALL
//
KEEP TEMPHELP.SOURCE
EXIT
!  FILE INPUT=TEMPHELP.SOURCE
!  FILE HELPCAT=xxxHELP.PROG
!  RUN MAKECAT.PUB.SYS,HELP
!  TELL @.account; FILE xxxHELP.PROG CREATED
!ENDIF
!PURGE TEMPHELP.SOURCE
!EOJ
!JOB USERPREP,MGR.account,USL;OUTCLASS=,1
!COMMENT ***********************************************************
!COMMENT * Create application program file from MENUSON.USL
!COMMENT ***********************************************************
!TELL @.account; PREP OF xxxPROG STARTING
!PURGE xxxPROG.PROG
!PURGE xxxUSL.USL
!SEGMENTER
USL MENUSON.USL
COPYUSL 1500,xxxUSL.USL
USL xxxUSL.USL
PURGERBM SEGMENT,USERCALL
AUXUSL USEROPEN.USL
COPY SEGMENT,USEROPEN
AUXUSL USERCALL.USL
COPY SEGMENT,USERCALL
AUXUSL USERCLOS.USL
COPY SEGMENT,USERCLOSE
AUXUSL new transaction.USL    << repeat these two lines for every >>
COPY SEGMENT,new transaction  << online subprogram                >>
LISTUSL
PREP xxxPROG.PROG;MAXDATA=31000;CAP=IA,PH,DS;PMAP
EXIT
!SAVE xxxPROG.PROG
!PURGE xxxUSL.USL
!TELL @.account PREP OF xxxPROG FINISHED
!EOJ
!JOB SLPROG,MGR.account;OUTCLASS=,1
!COMMENT *************************************************************
!COMMENT * Create a Segmented Library using parts of MENUSON.USL
!COMMENT * Note that the module USERCALL must not be present.
!COMMENT *************************************************************
!TELL @.account; CREATION OF SL.PROG STARTING
!PURGE SL.PROG
!CONTINUE
!SEGMENTER
BUILDSL SL.PROG,500,1
USL MENUSON.USL
ADDSL UVPLUS
ADDSL UERROR
ADDSL IASERROR
ADDSL UEXTRACT
ADDSL USTREAM
ADDSL USTRING
ADDSL USOUNDEX
ADDSL UDBOPEN
ADDSL UGETMENU
USL USEROPEN.USL
ADDSL USEROPEN
USL USERCLOS.USL
ADDSL USERCLOSE
LISTSL
EXIT
!TELL @.account CREATION OF SL.PROG COMPLETED
!EOJ
!JOB SLPUB,MGR.account;OUTCLASS=,1
!COMMENT *************************************************************
!COMMENT * Create a Segmented Library using parts of MENUSON.USL
!COMMENT *************************************************************
!TELL @.account; CREATION OF SL.PUB STARTING
!PURGE SL.PUB
!CONTINUE
!COMMENT  !SEGMENTER          These may be needed if the
!COMMENT  SL SL.PUB.IASV3     application is to use IAS.
!COMMENT  COPYSL 500,SL.PUB   Use instead of the next two
!SEGMENTER                    lines
BUILDSL SL.PUB,500,1
SL SL.PUB
USL MENUSON.USL
ADDSL UVPLUS
ADDSL UERROR
ADDSL IASERROR
ADDSL UEXTRACT
ADDSL USTREAM
ADDSL USTRING
ADDSL USOUNDEX
ADDSL UDBOPEN
ADDSL UGETMENU
USL USEROPEN.USL
ADDSL USEROPEN
USL USERCLOS.USL
ADDSL USERCLOSE
USL module1.USL  << repeat these lines for each >>
ADDSL module1    << online application module   >>
LISTSL
EXIT
!TELL @.account CREATION OF SL.PUB COMPLETED
!EOJ
!JOB XXX123,user.account,group;OUTCLASS=,1
!TELL user.account COMPILE OF XXX123 STARTED
!FILE COPYLIB=COPYLIB.SOURCE
!FILE IASMACRO=IASMACRO.LIB
!FILE xxxMACRO=xxxMACRO.LIB
!FILE LP=XXX123;DEV=LP,1
!FILE STANDARD=STANDARD.LIB
!FILE STDMACRO=STDMACRO.LIB
!FILE COBCNTL.PUB.SYS=CMDEV.COBCNTL.SYS
!COB85 XXX123,$NEWPASS,*LP,"$SET X1=ON"
!IF JCW >= WARN THEN
!   IF JCW > WARN THEN
!      TELL user.account      FATAL ERRORS IN XXX123
!   ELSE
!      TELL user.account      DODGY ERRORS IN XXX123
!   ENDIF
!ELSE
!   TELL user.account         XXX123 COMPILED OK
!BUILD TEMPFILE;TEMP;REC=-80,,F,ASCII;DISC=10000
!RUN SEGDVR.PUB.SYS;STDLIST=TEMPFILE
USL $OLDPASS
LISTUSL
EXIT
!FILE QEDITSCR=TEMPSCR
!RUN QEDIT.PUB.ROBELLE
O;DQ @;SET LANG JOB
T TEMPFILE
D 1/6
D ]-5/
SET RIGHT 3
D "   "
SET RIGHT 80
RENUM
A 1000=@
C 1 "PURGESL SEGMENT," 1/999
C 1 "ADDSL " 1000/
A .1
SL SL.account
USL $OLDPASS
//
A ]
EXIT
//
KEEP SEGIN
EXIT
!RUN SEGDVR.PUB.SYS;STDIN=SEGIN
!PURGE SEGIN
!TELL user.account      XXX123 now in SL.group
!EOJ
!JOB XXX123,user.account,SOURCE;OUTCLASS=,1
!TELL user.account      COMPILE OF XXX123 STARTED
!SQUISHER
U XXX123.SOURCE
EXIT
!FILE COPYLIB=COPYLIB.SOURCE
!FILE IASMACRO=IASMACRO.LIB
!FILE xxxMACRO=xxxMACRO.LIB
!FILE LP=XXX123;DEV=LP,1
!FILE STANDARD=STANDARD.LIB
!FILE STDMACRO=STDMACRO.LIB
!FILE COBCNTL.PUB.SYS=CMPROD.COBCNTL.SYS
!PURGE XXX123.USL
!COB85 XXX123.SOURCE,XXX123.USL,*LP
!IF JCW >= WARN THEN
!   IF JCW > WARN THEN
!      TELL user.account      FATAL ERRORS IN XXX123
!   ELSE
!      TELL user.account      DODGY ERRORS IN XXX123
!   ENDIF
!ELSE
!   TELL user.account         XXX123 COMPILED OK
!SQUISHER
S XXX123.SOURCE
EXIT
!EOJ
!JOB xxx123,user.account,group;OUTCLASS=,1
!TELL user.account      COMPILE OF xxx123 STARTED
!FILE COPYLIB=COPYLIB.SOURCE
!FILE IASMACRO=IASMACRO.LIB
!FILE xxxMACRO=xxxMACRO.LIB
!FILE LP=xxx123;DEV=LP,1
!FILE STANDARD=STANDARD.LIB
!FILE STDMACRO=STDMACRO.LIB
!FILE COBCNTL.PUB.SYS=CMDEV.COBCNTL.SYS
!COB85 xxx123,$NEWPASS,*LP,"$SET X1=ON"
!IF JCW >= WARN THEN
!   IF JCW > WARN THEN
!      TELL user.account     FATAL ERRORS IN xxx123
!   ELSE
!      TELL user.account     DODGY ERRORS IN xxx123
!   ENDIF
!ELSE
!   TELL user.account        XXX123 COMPILED OK
!PURGE xxx123P
!PREP $OLDPASS,xxx123P;MAXDATA=31000;CAP=IA,BA;PMAP
!SAVE xxx123P
!TELL user.account      xxx123 has been prepped
!EOJ
!JOB XXX123,user.account,SOURCE;OUTCLASS=,1
!TELL user.account      COMPILE OF XXX123 STARTED
!SQUISHER
U XXX123.SOURCE
EXIT
!FILE COPYLIB=COPYLIB.SOURCE
!FILE IASMACRO=IASMACRO.LIB
!FILE xxxMACRO=xxxMACRO.LIB
!FILE LP=XXX123;DEV=LP,1
!FILE STANDARD=STANDARD.LIB
!FILE STDMACRO=STDMACRO.LIB
!FILE COBCNTL.PUB.SYS=CMPROD.COBCNTL.SYS
!PURGE XXX123.USL
!COB85 XXX123.SOURCE,XXX123.USL,*LP
!IF JCW >= WARN THEN
!   IF JCW > WARN THEN
!      TELL user.account      FATAL ERRORS IN XXX123
!   ELSE
!      TELL user.account      DODGY ERRORS IN XXX123
!   ENDIF
!ELSE
!   TELL user.account         XXX123 COMPILED OK
!PURGE XXX123.PROG
!PREP XXX123.USL,XXX123.PROG;MAXDATA=31232;CAP=IA,BA;PMAP
!SAVE XXX123.PROG
!TELL user.account      XXX123 has been prepped
!SQUISHER
S XXX123.SOURCE
EXIT
!EOJ
!JOB NMCAT,MGR.account;OUTCLASS=,1
!COMMENT *************************************************************
!COMMENT * Rebuild user message catalog (NM version)
!COMMENT *************************************************************
!TELL @.account; RECREATING MESSAGE CATALOG
!PURGE USERCAT.NMPROG
!IF CIERROR=384 THEN
!  TELL @.account; FILE USERCAT.NMPROG IN USE - CANNOT BE PURGED
!ELSE
!  PURGE TEMPCAT.SOURCE
!  EDITOR
JOINQ STDCAT.LIB
JOINQ USERCAT.SOURCE
KEEP TEMPCAT.SOURCE
EXIT
!  RUN GENCAT.PUB.SYS;INFO="3;TEMPCAT.SOURCE;USERCAT.NMPROG;0"
!  PURGE TEMPCAT.SOURCE
!  TELL @.account; FILE USERCAT.NMPROG CREATED
!ENDIF
!EOJ
!JOB NMPREP,MGR.account,NMOBJ;OUTCLASS=,1
!COMMENT ***********************************************************
!COMMENT * Recreate Application program file (NM version)
!COMMENT ***********************************************************
!TELL MGR.account   XXXPROG.NMPROG being created
!PURGE XXXPROG.NMPROG
!LINK FROM=MENUSON;TO=XXXPROG.NMPROG;CAP=IA,BA,PH,DS&
!;RL=RL,STDRL;MAP;SHOW
EXIT
!TELL MGR.account   XXXPROG.NMPROG created
!EOJ
!JOB NMXL,MGR.account,NMOBJ;OUTCLASS=,1!JOB NMXL,MGR.account,NMOBJ;OUTCLASS=,1
!SETVAR HPAUTOCONT,TRUE
!COMMENT ***********************************************************
!COMMENT * Build Application XL files:
!COMMENT * - CLOSERL contains module USERCLOS, IASERROR
!COMMENT * - CLOSEXL contains module USERCLOS, IASERROR, UDUMMY
!COMMENT * - XL      contains everything else
!COMMENT ***********************************************************
!TELL MGR.account; Rebuilding application XL files
!PURGE CLOSERL.NMOBJ
!PURGE CLOSEXL.NMPROG
!LINKEDIT
BUILDRL RL=CLOSERL.NMOBJ;LIMIT=2
COPYRL FROM=RL;TO=CLOSERL.NMOBJ;MODULE=USERCLOS
COPYRL FROM=STDRL;TO=CLOSERL.NMOBJ;MODULE=IASERROR
CLEANRL RL=CLOSERL.NMOBJ;COMPACT
BUILDXL XL=CLOSEXL.NMPROG;LIMIT=3
ADDXL FROM=RL;TO=CLOSEXL.NMPROG;MODULE=USERCLOS
ADDXL FROM=STDRL;TO=CLOSEXL.NMPROG;MODULE=IASERROR
ADDXL FROM=UDUMMY;TO=CLOSEXL.NMPROG
CLEANXL XL=CLOSEXL.NMPROG;COMPACT
EXIT
!PURGE XL.NMPROG
!LINKEDIT
BUILDXL XL=XL.NMPROG;LIMIT=100
XL XL=XL.NMPROG
ADDXL FROM=RL;MODULE=USEROPEN
ADDXL FROM=RL;MODULE=USERCALL
ADDXL FROM=RL;MODULE=USERCLOS
<< put all other application modules here >>
CLEANXL ;COMPACT
LISTXL
EXIT
!TELL MGR.account; Application XL files have been rebuilt
!EOJ
!JOB XXX123,user.account,group;OUTCLASS=,1
!SETVAR HPAUTOCONT,TRUE
!TELL user.account      COMPILE OF XXX123 STARTED
!FILE COPYLIB=COPYLIB.SOURCE
!FILE IASMACRO=IASMACRO.LIB
!FILE xxxMACRO=xxxMACRO.LIB
!FILE LP=XXX123;DEV=LP,1
!FILE STANDARD=STANDARD.NMLIB
!FILE STDMACRO=STDMACRO.NMLIB
!FILE COBCNTL.PUB.SYS=NMDEV.COBCNTL.SYS
!COB85XL XXX123,$NEWPASS,*LP;INFO="$SET X1=ON"
!IF JCW >= WARN THEN
!   IF JCW > WARN THEN
!      TELL user.account      FATAL ERRORS IN XXX123
!   ELSE
!      TELL user.account      DODGY ERRORS IN XXX123
!   ENDIF
!ELSE
!   TELL user.account         XXX123 COMPILED OK
!LISTF XL,2
!IF (CIERROR = 907) THEN
!   TELL user.account      Building XL.group
!   LINKEDIT
BUILDXL XL=XL;LIMIT=10
EXIT
!ENDIF
!LINKEDIT
XL XL=XL
PURGEXL MODULE=XXX123
ADDXL FROM=$OLDPASS
CLEANXL ;COMPACT
LISTXL
EXIT
!TELL user.account      XXX123 now in XL.group
!EOJ
!JOB XXX123,user.account,SOURCE;OUTCLASS=,1
!SETVAR HPAUTOCONT,TRUE
!TELL user.account      COMPILE OF XXX123 STARTED
!SQUISHER
U XXX123.SOURCE
EXIT
!FILE COPYLIB=COPYLIB.SOURCE
!FILE IASMACRO=IASMACRO.LIB
!FILE xxxMACRO=xxxMACRO.LIB
!FILE LP=XXX123;DEV=LP,1
!FILE STANDARD=STANDARD.NMLIB
!FILE STDMACRO=STDMACRO.NMLIB
!FILE COBCNTL.PUB.SYS=NMPROD.COBCNTL.SYS
!COB85XL XXX123.SOURCE,RL.NMOBJ,*LP
!IF JCW >= WARN THEN
!   IF JCW > WARN THEN
!      TELL user.account      FATAL ERRORS IN XXX123
!   ELSE
!      TELL user.account      DODGY ERRORS IN XXX123
!   ENDIF
!ELSE
!   TELL user.account         XXX123 COMPILED OK
!LINKEDIT
CLEANRL RL=RL.NMOBJ
EXIT
!SQUISHER
S XXX123.SOURCE
EXIT
!EOJ
!JOB XXX123,user.account,group;OUTCLASS=,1
!SETVAR HPAUTOCONT,TRUE
!TELL user.account      COMPILE OF XXX123 STARTED
!FILE COPYLIB=COPYLIB.SOURCE
!FILE IASMACRO=IASMACRO.LIB
!FILE xxxMACRO=xxxMACRO.LIB
!FILE LP=XXX123;DEV=LP,1
!FILE STANDARD=STANDARD.NMLIB
!FILE STDMACRO=STDMACRO.NMLIB
!FILE COBCNTL.PUB.SYS=NMDEV.COBCNTL.SYS
!COB85XL XXX123,$NEWPASS,*LP;INFO="$SET X1=ON"
!IF JCW >= WARN THEN
!   IF JCW > WARN THEN
!      TELL user.account      FATAL ERRORS IN XXX123
!   ELSE
!      TELL user.account      DODGY ERRORS IN XXX123
!   ENDIF
!ELSE
!   TELL user.account         XXX123 COMPILED OK
!PURGE XXX123P
!LINK FROM=$OLDPASS;TO=XXX123P&
!;RL=RL.NMOBJ,STDRL.NMOBJ,CLOSERL.NMOBJ&
!;CAP=IA,BA;MAP;SHOW
!TELL user.account      XXX123 has been prepped
!EOJ
!JOB XXX123,user.account,SOURCE;OUTCLASS=,1
!SETVAR HPAUTOCONT,TRUE
!TELL user.account      COMPILE OF XXX123 STARTED
!SQUISHER
U XXX123.SOURCE
EXIT
!FILE COPYLIB=COPYLIB.SOURCE
!FILE IASMACRO=IASMACRO.LIB
!FILE xxxMACRO=xxxMACRO.LIB
!FILE LP=XXX123;DEV=LP,1
!FILE STANDARD=STANDARD.NMLIB
!FILE STDMACRO=STDMACRO.NMLIB
!FILE COBCNTL.PUB.SYS=NMPROD.COBCNTL.SYS
!PURGE XXX123.NMOBJ
!COB85XL XXX123.SOURCE,XXX123.NMOBJ,*LP
!IF JCW >= WARN THEN
!   IF JCW > WARN THEN
!      TELL user.account      FATAL ERRORS IN XXX123
!   ELSE
!      TELL user.account      DODGY ERRORS IN XXX123
!   ENDIF
!ELSE
!   TELL user.account         XXX123 COMPILED OK
!PURGE XXX123.NMPROG
!LINK FROM=XXX123.NMOBJ;TO=XXX123.NMPROG&
!;RL=RL.NMOBJ,STDRL.NMOBJ,CLOSERL.NMOBJ&
!;CAP=IA,BA;MAP;SHOW
!TELL user.account      XXX123 has been prepped
!SQUISHER
S XXX123.SOURCE
EXIT
!EOJ
!JOB COMPALL,MGR.account,SOURCE;OUTCLASS=LP,2
!RUN SQUISHER.UTIL.SYS
U @.SOURCE
EXIT
!FILE STANDARD=STANDARD.LIB
!FILE STDMACRO=STDMACRO.LIB
!FILE COPYLIB=COPYLIB.SOURCE
!FILE xxxMACRO=xxxMACRO.LIB
!FILE IASMACRO=IASMACRO.LIB
!FILE COBCNTL.PUB.SYS=CMPROD.COBCNTL.SYS
!TELL @.account;
!TELL @.account; STARTING BATCH  COMPILATIONS
!TELL @.account;
!PURGE prog1.USL
!COB85 prog1,prog1.USL,$NULL
!PURGE prog1.PROG
!PREP  prog1.USL,prog1.PROG;MAXDATA=31232;CAP=IA,BA,PMAP
!SAVE  prog1.PROG
!TELL @.account;
!TELL @.account; STARTING ONLINE COMPILATIONS
!TELL @.account;
!PURGE USEROPEN.USL
!COB85 USEROPEN,USEROPEN.USL,$NULL
!PURGE USERCALL.USL
!COB85 USERCALL,USERCALL.USL,$NULL
!PURGE USERCLOS.USL
!COB85 USERCLOS,USERCLOS.USL,$NULL
!PURGE module1.USL
!COB85 module1,module1.USL,$NULL
!PURGE module2.USL
!COB85 module2,module2.USL,$NULL
<< put other modules here >>
!TELL @.account; ALL DONE!
!EOJ
!JOB NMCOMP,MGR.account,SOURCE;OUTCLASS=,2
!SETVAR HPAUTOCONT,TRUE
!FILE STANDARD=STANDARD.NMLIB
!FILE STDMACRO=STDMACRO.NMLIB
!FILE COPYLIB=COPYLIB.SOURCE
!FILE XXXMACRO=XXXMACRO.LIB
!FILE IASMACRO=IASMACRO.LIB
!FILE COBCNTL.PUB.SYS=NMPROD.COBCNTL.SYS
!TELL MGR.account
!TELL MGR.account Starting native mode compiles ...
!TELL MGR.account
!COMMENT ***********************************************************
!COMMENT * All programs go into <progname>.NMOBJ
!COMMENT ***********************************************************
!PURGE program.NMOBJ
!COB85XL program,program.NMOBJ,$NULL
!PURGE program.NMPROG
!LINK FROM=program.NMOBJ;TO=program.NMPROG&
!;RL=RL.NMOBJ,STDRL.NMOBJ,CLOSERL.NMOBJ&
!;CAP=IA,BA;MAP;SHOW
!COMMENT ***********************************************************
!COMMENT * All subprograms go into RL.NMOBJ
!COMMENT ***********************************************************
!PURGE RL.NMOBJ
!LINKEDIT
BUILDRL RL=RL.NMOBJ;LIMIT=100
EXIT
!COB85XL USEROPEN,RL.NMOBJ,$NULL
!COB85XL USERCALL,RL.NMOBJ,$NULL
!COB85XL USERCLOS,RL.NMOBJ,$NULL
!COB85XL module1,RL.NMOBJ,$NULL
!COB85XL module2,RL.NMOBJ,$NULL
!COB85XL module3,RL.NMOBJ,$NULL
<< put other modules here >>
!TELL MGR.account
!TELL MGR.account Compilations done - listing RL file
!TELL MGR.account
!LINKEDIT
RL RL=RL.NMOBJ
CLEANRL ;COMPACT
LISTRL
EXIT
!EOJ
$CONTROL DYNAMIC

$INCLUDE STDMACRO
$INCLUDE USERMACR

 %ID(MENU17#,Tony Marston#,March 1989#)
******************************************************************
* REMARKS:
*
* This subprogram is called to maintain the M-USER-GROUP dataset.
* It may be used to add, modify or enquire on group details, but
* there is no delete facility.
*
* Note: all user groups are prefixed with the company number.
*
******************************************************************
* DATABASE - PROMEN
*
* DATASETS:
*
* M-USER-GROUP     - user group details
*
******************************************************************
* VPLUS FORMS:
*
* MS01		- selection
* MS01A		- addition
* MS01B		- modification
* MS01E		- enquiry
*
******************************************************************
* AMENDMENT HISTORY:
*
* 1) Added %VERSION macro for version number checking.
*    Tony Marston - 22/11/89 - version 01.001.000
*
******************************************************************

 %ED.

 DATA DIVISION.
 WORKING-STORAGE SECTION.

 01  MS01-BUFFER.
     03  MS01-STD-HEAD-1          PIC X(78).
     03  MS01-STD-HEAD-1          PIC X(78).
     03  MS01-DATA.
         05  MS01-USER-GROUP      PIC X(02).
         05  MS01-GROUP-NAME      PIC X(40).
         05  MS01-TIMEOUT         PIC ZZZ9.
         05  MS01-ACCESS-ALLOWED  PIC X(01).
         05  MS01-IN-USE          PIC ZZZ9.

 COPY PROMENMS IN STANDARD.

 LINKAGE SECTION.

 COPY COMAREA IN STANDARD NOLIST.

 COPY USERLINK IN STANDARD.

 PROCEDURE DIVISION USING COMMON-LINKAGE
                          USER-LINKAGE.

 A-MENU17-CONTROL SECTION.
******************************************************************
*
* This section is the main control section
*
******************************************************************
 A-10-START.

    %VERSION(MENU17#,01.001.000#,     #).

    PERFORM B-SELECT
    UNTIL F8
    OR    MENU-AUTO-SELECT NOT = SPACES.

 A-EXIT.
    GOBACK.


 B-SELECT SECTION.
******************************************************************
* Ask user to input a USER-GROUP - if it exists go into enquire
* mode, otherwise go into input mode.
*****************************************************************
 B-10-INIT.

    %SAVINITFORM(B-10#,MS01#).

 B-20-SELECT.

    %ACCEPTENTER(B-20#).

    IF F8
        GO TO B-EXIT.

    %VGETBUFFER(B-20#,MS01-BUFFER#).

    MOVE MENU-COMPANY       TO COMPANY-ID OF MS-COMPANY-GROUP.
    MOVE MS01-USER-GROUP    TO USER-GROUP OF MS-COMPANY-GROUP.
    %DBGET7(B-20#,MENU#,M-USER-GROUP#,MS-COMPANY-GROUP#).

    IF IMAGE-OK
        PERFORM E-ENQUIRE
    ELSE
        PERFORM C-CREATE
    END-IF.

 B-EXIT.
    EXIT.


 C-CREATE SECTION.
*****************************************************************
* This section adds new records to the M-USER-GROUP dataset.
*****************************************************************
 C-10-INIT.

    %SAVINITFORM(C-10#,MS01A#).

    **** MOVE "RESELECT" TO VIEW-LABEL(5).
    MOVE "015240"        TO VIEW-LABEL(5).

 C-20-ACCEPT.

    %ACCEPTENTER(C-20#).

    IF F0
        %VGETBUFFER(C-20#,MS01-BUFFER#)
        PERFORM CA-CREATE-RECORD
        IF IMAGE-LOCK-FAILURE
            GO TO C-20-ACCEPT
        END-IF
    END-IF.

 C-EXIT.
    EXIT.


 CA-CREATE-RECORD SECTION.
******************************************************************
* Create a new record on dataset M-USER-GROUP.
******************************************************************
 CA-10-LOCK.

    %SETLOCK(1#,M-USER-GROUP#,@#,EQ#,SPACE#).

    %DBLOCK(CA-10#,MENU#).
    IF IMAGE-LOCK-FAILURE
        GO TO CA-EXIT.

 CA-20-PUT.

    %DBBEGIN(CA-20#,MENU#).

    MOVE MENU-COMPANY           TO COMPANY-ID OF MS-COMPANY-GROUP
    MOVE MS01-USER-GROUP        TO USER-GROUP OF MS-COMPANY-GROUP
    MOVE MS01-GROUP-NAME        TO MS-GROUP-NAME.
    MOVE MS01-TIMEOUT           TO MS-TIMEOUT.
    MOVE MS01-ACCESS-ALLOWED    TO MS-ACCESS-ALLOWED.
    MOVE ZERO                   TO MS-IN-USE.

    %DBPUT(CA-20#,MENU#,M-USER-GROUP#).

    %DBEND(CA-20#,MENU#).

    %DBUNLOCK(CA-20#,MENU#).

 CA-EXIT.
    EXIT.


 E-ENQUIRE SECTION.
*****************************************************************
* Display details from the selected record.
* The user may elect to modify this record with function key 4.
*****************************************************************
 E-10-INIT.

    %SAVINITFORM(E-10#,MS01E#).

    PERFORM EA-LOAD-DETAILS.

    **** MOVE " MODIFY " TO VIEW-LABEL(4).
    MOVE "015170"        TO VIEW-LABEL(4).
    **** MOVE "RESELECT" TO VIEW-LABEL(5).
    MOVE "015240"        TO VIEW-LABEL(5).

 E-20-ACCEPT.

%ACCEPTFUNCTION(E-20#).

    EVALUATE TRUE
        WHEN F4       PERFORM M-MODIFY
        WHEN OTHER    GO TO E-EXIT
    END-EVALUATE.

 E-EXIT.
    EXIT.


 EA-LOAD-DETAILS SECTION.
******************************************************************
* Load details from M-USER-GROUP into the screen buffer.
******************************************************************
 EA-10.

    MOVE USER-GROUP OF MS-COMPANY-GROUP	TO MS01-USER-GROUP.
    MOVE MS-GROUP-NAME                  TO MS01-GROUP-NAME.
    MOVE MS-TIMEOUT                     TO MS01-TIMEOUT.
    MOVE MS-ACCESS-ALLOWED              TO MS01-ACCESS-ALLOWED.
    MOVE MS-IN-USE                      TO MS01-IN-USE.

    %VPUTBUFFER(EA-10#,MS01-BUFFER#).

 EA-EXIT.
    EXIT.


 M-MODIFY SECTION.
******************************************************************
* This section modifies an existing record in M-USER-GROUP.
******************************************************************
 M-10-INIT.

    %SAVINITFORM(M-10#,MS01B#).

    ***** MOVE "RESELECT" TO VIEW-LABEL(5).
    MOVE "015240"         TO VIEW-LABEL(5).

 M-20-ACCEPT.

    %ACCEPTENTER(M-20#).

    IF F0
        %VGETBUFFER(M-20#,MS01-BUFFER#)
        PERFORM MB-UPDATE-RECORD
        IF IMAGE-LOCK-FAILURE
            GO TO M-20-ACCEPT
        END-IF
    END-IF.

 M-EXIT.
    EXIT.


 MB-UPDATE-RECORD SECTION.
*****************************************************************
* This section updates the M-USER-GROUP dataset
*****************************************************************
 MB-10-LOCK.

    %SETLOCK(1#,M-USER-GROUP#,COMPANY-GROUP#,EQ#
               ,MS-COMPANY-GROUP#).

    %DBLOCK(MB-10#,MENU#).
    IF IMAGE-LOCK-FAILURE
        GO TO MB-EXIT.

 MB-20-UPDATE.

    %DBBEGIN(MB-20#,MENU#).

    %DBGET7(MB-20#,MENU#,M-USER-GROUP#,MS-COMPANY-GROUP#).

    MOVE MS01-GROUP-NAME        TO MS-GROUP-NAME.
    MOVE MS01-TIMEOUT           TO MS-TIMEOUT.
    MOVE MS01-ACCESS-ALLOWED    TO MS-ACCESS-ALLOWED.

    %DBUPDATE(MB-20#,MENU#,M-USER-GROUP#).

    %DBEND(MB-20#,MENU#).

    %DBUNLOCK(MB-20#,MENU#).

 MB-EXIT.
    EXIT.
$CONTROL SOURCE

$INCLUDE STDMACRO
$INCLUDE IASMACRO
$INCLUDE INVMACRO

 %ID(INV500#,Anne Onnymous#, 26th May 1989#).
******************************************************************
* BATCH STATUS CHANGE PROGRAM.
*
* This program will read an input file of document numbers (same
* format as INVRQST file) and update the status on the invoice
* header to the value specified as the PARM number on the RUN
* command (e.g: RUN INV500;PARM=10).

* Any value between 1 and 29 can be specified except 20, which
* can only be set by the IAS posting routine. In all cases the
* new status value must be greater than the current value.
*
******************************************************************
* DATABASES:                                                     *
*                                                                *
*        INVDB           -   Invoice Database                    *
*                                                                *
*            INV-HEADER  -   Invoice Header    R/W               *
*                                                                *
******************************************************************
* FILES:                                                         *
*                                                                *
*    Input      -  INPUT     -  Invoice Numbers                  *
*                                                                *
*    Output     -  VALID     -  Successful Invoices              *
*               -  INVALID   -  Unsuccessful Invoices            *
*                                                                *
******************************************************************

 %ED.

 INPUT-OUTPUT SECTION.
 FILE-CONTROL.

    SELECT INFILE  ASSIGN TO "INPUT".
    SELECT VALID   ASSIGN TO "VALID".
    SELECT INVALD  ASSIGN TO "INVALID".

 DATA DIVISION.

 FILE SECTION.

*-----------------------------------------------------------------
* Invoice Numbers to be processed
*-----------------------------------------------------------------

 FD INFILE.
 01  INFILE-DOC-REF.
     03  INFILE-COMPANY-NO   PIC X(2).
     03  INFILE-DOCNO        PIC X(6).
     03  INFILE-DOCTYPE      PIC X(2).

*-----------------------------------------------------------------
* Invoices successfully processed
*-----------------------------------------------------------------

 FD VALID.
 01  VALID-DOC-REF.
     03  VALID-COMPANY-NO   PIC X(2).
     03  VALID-DOCNO        PIC X(6).
     03  VALID-DOCTYPE      PIC X(2).

*-----------------------------------------------------------------
* Invoices not successfully processed
*-----------------------------------------------------------------

 FD INVALD.
 01  INVALD-DOC-REF.
     03  INVALD-COMPANY-NO   PIC X(2).
     03  INVALD-DOCNO        PIC X(6).
     03  INVALD-DOCTYPE      PIC X(2).


 WORKING-STORAGE SECTION.

 01  WS-VALID-COUNT              PIC 9(4) VALUE ZERO.
 01  WS-INVALD-COUNT             PIC 9(4) VALUE ZERO.
 01  WS-INFILE-COUNT             PIC 9(4) VALUE ZERO.

 01  W01-PARM                    PIC S9(4) COMP VALUE ZERO.

 01  W01-PARM-STRING             PIC 99.
 01  FILLER REDEFINES W01-PARM-STRING.
     03  W01-PARM-A              PIC X.
     03  W01-PARM-B              PIC X.

 01  W01-CURR-STATUS             PIC S9(4) COMP.

******************************************************************
*                                                                *
*    Copy Library Entries                                        *
*                                                                *
*    INVDBVIH-   INVDB.INV-HEADER          Invoice header        *
*                                                                *
*    USERLINK-   Items used within INVOICE system.               *
*    COMAREA -   Common Linkage Variables                        *
*                                                                *
******************************************************************

 COPY    INVDBVIH    IN COPYLIB.
 COPY    USERLINK    IN COPYLIB.
 COPY    COMAREA     IN STANDARD.


PROCEDURE DIVISION.

 %DEBUG(INV500#)

 A-CONTROL SECTION.
******************************************************************
*                                                                *
* CONTROL SECTION                                                *
*                                                                *
******************************************************************
 A-10-INIT.

     %BATCHINIT(INV500#,Prolog Batch Status Change#).

     %VERSION(INV500#,01.000.000#,     #).

     PERFORM B-OPEN-FILES.
     IF VEDIT-ERRORS
         GO TO A-EXIT
     END-IF.

 A-20-PROCESS.

     PERFORM C-PROCESS-RECORDS
         UNTIL INFILE-DOC-REF = HIGH-VALUES.

 A-30-CLOSE.

     PERFORM D-CLOSE.

 A-EXIT.
     STOP RUN.


 B-OPEN-FILES SECTION.
******************************************************************
* Get PARM value, Open all the files, Lock INV-HEADER
******************************************************************
 B-05-GETINFO-PARM.

     CALL INTRINSIC "GETINFO" USING \\, \\, W01-PARM.

     IF (W01-PARM < 1)
     OR (W01-PARM = 20)
     OR (W01-PARM > 29)
        DISPLAY "PARM value on RUN statement not within range",
                " (1-19, 21-29)"
        MOVE 1 TO VIEW-NUMERRS
        GO TO B-EXIT.

     MOVE W01-PARM               TO W01-PARM-STRING.

D    DISPLAY W01-PARM-STRING.

 B-10-INVDB.

     PERFORM BA-OPEN-INVDB.

 B-20-OPEN-FLAT-FILES.

     OPEN INPUT  INFILE.
     OPEN OUTPUT VALID.
     OPEN OUTPUT INVALD.

 B-30-LOCK.

     %SETLOCK(1#,INV-HEADER#,@#,EQ#,SPACES#).
     %DBLOCK(B-30#,INV#).
     IF IMAGE-LOCK-FAILURE
        GO TO B-30-LOCK.

 B-EXIT.
     EXIT.


 BA-OPEN-INVDB SECTION.
******************************************************************
* This opens the invoice database.                               *
******************************************************************
 BA-10-INIT.

     MOVE "  INVDB.DATA"         TO INV-BASE-NAME.
     MOVE "WRITER"               TO INV-PASSWORD.
     MOVE "N"                    TO INV-BASE-FLAG.

     %DBOPEN(BA-10#,INV#).

 BA-EXIT.
     EXIT.


 C-PROCESS-RECORDS SECTION.
******************************************************************
* This section processes next invoice number. If it passes the   *
* validation then update the status on INV-HEADER to the PARM    *
* value.                                                         *
******************************************************************
 C-05-INIT.

     MOVE 0 TO VIEW-NUMERRS.
     MOVE 0 TO IMAGE-COND.

 C-10-READ.

     READ INFILE
         AT END
             MOVE HIGH-VALUES TO INFILE-DOC-REF
             GO TO C-EXIT.

     ADD 1 TO WS-INFILE-COUNT.

 C-20-GET-INV-HEADER.

     MOVE INFILE-DOC-REF TO VIH-DOC-REF.

     PERFORM ZA-READ-INV-HEADER.

     IF IMAGE-NO-ENTRY OR IMAGE-END-OF-CHAIN
         DISPLAY INFILE-DOC-REF, " - Invoice does not exist"
         PERFORM ZC-WRITE-TO-INVALD
         GO TO C-EXIT.

 C-30-VALIDATE.
     PERFORM CA-VALIDATE-PARM.
     IF VEDIT-ERRORS
        GO TO C-EXIT.

 C-40-UPD-INV-HEADER.

     MOVE W01-PARM-STRING TO VIH-INV-STATUS.
     MOVE MENU-TODAY      TO VIH-INV-STATUS-DATE.

     PERFORM ZB-UPDATE-INV-HEADER.

     DISPLAY INFILE-DOC-REF, " - Invoice Header updated"
     PERFORM ZD-WRITE-TO-VALID.

 C-EXIT.
     EXIT.


 CA-VALIDATE-PARM SECTION.
******************************************************************
* This section validates the value specified as the PARM
* number on the RUN statement.
******************************************************************
 CA-10-PARM.

     %UNUMBER1(VIH-INV-STATUS#,W01-CURR-STATUS#).

     IF (W01-PARM NOT > W01-CURR-STATUS)
        DISPLAY INFILE-DOC-REF,
        " - PARM value must be greater than the current value"
        PERFORM ZC-WRITE-TO-INVALD
        GO TO CA-EXIT.

     IF (W01-CURR-STATUS < 20)
         IF (W01-PARM NOT < 20)
             DISPLAY INFILE-DOC-REF,
     " - PARM value must be < 20 as curr value is in range 1-19"
             PERFORM ZC-WRITE-TO-INVALD
             GO TO CA-EXIT.

 CA-EXIT.
     EXIT.


 D-CLOSE SECTION.
******************************************************************
*    This section closes the files and checks control totals.
******************************************************************
 D-10-INVDB.

     %DBUNLOCK(D-10#,INV#).

     %DBCLOSE(INV#).
 D-20-FLAT-FILES.

     CLOSE INFILE.
     CLOSE VALID.
     CLOSE INVALD.

 D-30-CONTROL-TOTALS.

     DISPLAY    "******************************************".
     DISPLAY    "Invoice No.s read    = ", WS-INFILE-COUNT.
     DISPLAY    "Invoice No.s invalid = ", WS-INVALD-COUNT.
     DISPLAY    "Invoice No.s valid   = ", WS-VALID-COUNT.
     DISPLAY    "******************************************".

     IF WS-INFILE-COUNT NOT = (WS-VALID-COUNT + WS-INVALD-COUNT)
        DISPLAY "******************************************"
        DISPLAY "       ERROR - CONTROL TOTALS MISMATCH    "
        DISPLAY "******************************************"
        %PUTJCW(INV500JCW#,10#)
     ELSE
        DISPLAY "******************************************"
        DISPLAY "           CONTROL TOTALS MATCH           "
        DISPLAY "******************************************".

 D-EXIT.
     EXIT.


 ZA-READ-INV-HEADER SECTION.
******************************************************************
* Read INV-HEADER
******************************************************************
 ZA-10.

     %DBFETCH(ZA-10#,INV#,INV-HEADER#,DOC-REF#,VIH-DOC-REF#).

 ZA-EXIT.
     EXIT.

 ZB-UPDATE-INV-HEADER SECTION.
******************************************************************
* Update INV-HEADER
******************************************************************
 ZB-10.

     %DBUPDATE(ZB-10#,INV#,INV-HEADER#).

 ZB-EXIT.
     EXIT.

 ZC-WRITE-TO-INVALD SECTION.
******************************************************************
*    Write invoice number to INVALD file.
******************************************************************
 ZC-10-WRITE.

     WRITE INVALD-DOC-REF FROM INFILE-DOC-REF.
     ADD 1  TO WS-INVALD-COUNT.
     MOVE 1 TO VIEW-NUMERRS.

 ZC-EXIT.
     EXIT.

 ZD-WRITE-TO-VALID SECTION.
******************************************************************
*    Write invoice number to VALID file.
******************************************************************
 ZD-10-WRITE.

     WRITE VALID-DOC-REF FROM INFILE-DOC-REF.
     ADD 1 TO WS-VALID-COUNT.

 ZD-EXIT.
     EXIT.
The COBOL compiler always looks for default $CONTROL statements from a file called COBCNTL.PUB.SYS. We have created some variations which should be used in the appropriate compilation job by means of a file equate:-
*
$CONTROL LIST,SOURCE,NOCODE,NOCROSSREF,ERRORS=100,NOVERBS,WARN
$CONTROL LINES=60,NOMAP,MIXED,QUOTE=",NOSTDWARN,SYNC16,BOUNDS
*
*
$CONTROL LIST,SOURCE,NOCODE,NOCROSSREF,ERRORS=100,NOVERBS,WARN
$CONTROL LINES=60,NOMAP,MIXED,QUOTE=",NOSTDWARN,SYNC16
*
*
$CONTROL LIST,SOURCE,NOCODE,NOCROSSREF,ERRORS=100,NOVERBS,WARN
$CONTROL LINES=60,NOMAP,MIXED,QUOTE=",NOSTDWARN,SYNC32,INDEX32
$CONTROL VALIDATE,BOUNDS,OPTIMIZE=0
$CONTROL OPTFEATURES=CALLALIGNED LINKALIGNED
*
*
$CONTROL LIST,SOURCE,NOCODE,NOCROSSREF,ERRORS=100,NOVERBS,WARN
$CONTROL LINES=60,NOMAP,MIXED,QUOTE=",NOSTDWARN,SYNC32,INDEX32
$CONTROL NOVALIDATE,OPTIMIZE=1
$CONTROL OPTFEATURES=CALLALIGNED LINKALIGNED
*
- END -